Showing posts with label Color My World. Show all posts

Friday, March 25, 2016

Glittered Artist Palette with Kara

Hey Guys! It's Kara and today is the first day of my Spring Break! When I'm not crafting, I'm an American Sign Language interpreter for a deaf student in high school. I love it, but Spring Break? Yes, please! In honor of spring, I have a glittery rainbow to share with you.

Double sided adhesive is a wonderful thing, especially when it comes to using glitter.  The most common complaint that I hear about using glitter is related to the mess.  When you use double sided adhesive it really cuts down on the mess.  The glitter sticks instantly, unlike with liquid glues.

I'd love to paint with this glittery rainbow!

Creating the Glittered Palette

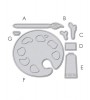
Start by prepping the palette for the glitter. Apply double sided adhesive to a piece of white card stock, leaving the release paper in place on the exposed side. Position the Artist Palette Die on top of the cardstock with the release paper side up. Run it through your die cutting machine. My machine cuts the perimeter of the die on the first pass, but not all the way through the individual wells of color, which is perfect for this. Now it's time to add the glitter, and we'll do this is stages:

  1. Remove the release paper from one of the individual blobs of paint and add a little sprinkle of glitter. Press the glitter into the adhesive, shake off the excess. I always do this on a piece of copy paper for easy clean up. Repeat for the remaining colors, working one at a time to keep the glitter colors separate.
  2. Carefully remove the rest of the release paper from the palette. I find that peeling from the end opposite the thumb hole prevents stray glitter from attaching itself to the palette.
  3. Add your background glitter.  In this case, I wanted white, but you could use any color you like.

I did the same for the paintbrush, carefully peeling back the release paper to reveal specific portions to add glitter by desired color.

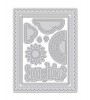
I added a simple white heat embossed sentiment using the Color My World stamp set. I enhanced the word 'color' with a copic marker that was a shade darker than the Ballet Slippers cardstock card front. A little added detail comes from the Sunshine Layers Die. I've layered the card front up with a piece of vellum and black cardstock cut with the same die.

I hope you've enjoyed! Thanks so much for coming by today.

Featured Wplus9 Supplies

Thursday, February 25, 2016

A World Without You

Hello everyone! It's Joni and today I'm sharing my take on the awesome new Color My World stamp set. And, I'm combining it with an unlikely candidate - the cute bear from the Happy Mail stamp set.

Although these are two completely different styles of stamp sets, they make a perfect match, don't you think?

To begin, I created a standard A2 card base from black card stock and a watercolor panel just a little bit smaller than an A2 card. Next, I stamped the sentiment from Color My World in Versamark ink and heat embossed it with white embossing powder. Using Windsor & Newton watercolors, I added bright pools of color over the sentiment and a just a bit beyond. The heat embossing resists the color and allows the sentiment to pop out of the pools of color.

The grass was added with a little free-hand watercolor (grass is an easy one to tackle free-hand as it doesn't have to be perfect). I also watercolored the bear, ink tubes and paint brush images, fussy cut them and adhered with foam tape.

A little sparkle in the form of Pretty Pink Posh Sparkling Clear sequins finishes it off.

Wplus9 Supplies:
Stamps: Color My World and Happy Mail // Cardstock: WhiteBlack

Thanks so much for stopping by!

Featured Wplus9 Supplies

Wednesday, February 3, 2016

Release Week February 2016 - Color My World

Wplus9 Supplies:
Stamps: Color My World {Available 2/5/16}   // Dies: Love Mom Layers Die   // Cardstock: White
 
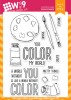
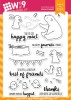
Welcome back to Day 3 of the February Release!  Kara here today to share a few projects I created using the new Color My World stamp set.  This set is all about color so I pulled out my Copic Markers. 
 

Color My World
4x6" Clear Stamp Set
$14 USD

I stamped out several of the images from this set onto white cardstock and colored them with bright, primary colors.  I fussy cut each image, which was super easy to do!  For my card front, I die cut a piece of white cardstock with the Love Mom Layers rounded stitched rectangle.  I centered the large stitched circle on my panel and sent it through my die cut machine one more time.  Inside the circle window I stamped one of the two large sentiments from the Color My World stamp set.  I love that several of the words in the sentiment can be colored as well.  I positioned my brushes and paints around the circle window to frame the sentiment.
 
 
 I put the die cut circle from this first card to use on my second project.  I used it to stamp the sentiment and act as the focal point of my design.  The background has been stamped with all of the images from the set and colored with the same markers.

 Wplus9 Supplies:
Stamps: Color My World {Available 2/5/16}  // Dies: Love Mom Layers Die  // Cardstock: White
 
I love the little word stamps: Create, Inspire, Explore!  They could be used in so many ways, but they fit perfectly on the tubes of paint.
 
 
 I hope you have enjoyed taking a closer look at the Color My World stamp set today.  Stay tuned, there is so much more to see!
 

Giveaway Alert

As usual, during Release Week we also have some goodies up for grab!

Would you like to win a $25 store credit to wplus9.com? Just leave a comment below by 9:00 a.m. EST on 02/04/16 to enter and I will select one random winner from all comments. Winner will be posted on our Winners page by noon on 02/04/16.

Connect with us:

Follow Us on Pinterest