Wednesday, May 31, 2017

One Layer Spring Blooms with Yana

Hello friends! This is Yana and I hope you are having a fabulous week!

We often get carried away with elaborate techniques and tricks and the cards we make become rather difficult to copy or mass produce. Today I decided to create a simple and approachable card featuring stamping only.

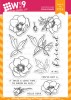
I picked Spring Bloom stamp set to do most of my stamping and also Bold Banner Greetings stamp set for my sentiment. For my color combo I went with something new. I used Warm Wool, Sweet Nectar, Miami Spice and Siren Song. A rather unusual color combination, but definitely a fresh and fun one to try.


Watch above or watch in HD at YouTube

This card features stamped pattern that consist of one image - floral cluster being repeatedly stamped onto the background. I picked one of the large clusters from the Spring Bloom stamp set and stamped it 5 or 6 times to cover the front of my card. Only 3 times if you count full images, and not the little partial impressions.

I didn’t use my stamp positioner for this card and only did my stamping using a clear block as I didn’t feel I needed to use a MISTI or similar tool. The reason I picked this particular image and not something else is the striped detail on the leaves. Since I was making a very simple one layer card I needed to use something that would add additional interest. And those striped textured looking leaves fit the bill perfectly.

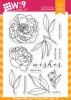
I stamped my image several times rotating it on my paper and making sure to leave enough white space for the sentiment and little florals. Overall I stamped it 6 times, but only 3 impressions ended up being almost complete on this card.

Next, while I still had room on my card, I added a sentiment. You could (and probably should) start your stamping with a sentiment, but I planned ahead of time where I wanted my message to be, so I first stamped the other large elements on my card. For my sentiment I went with Hello, Lovely.

Next I added flowers inside the floral cluster and I stamped those using the lighter peach color, Sweet Nectar. Flower centers were stamped in the same Warm Wool color and again I loved how a center was not a solid image, but rather a textured-looking one. I also stamped some additional stems and flower buds in a slightly darker peach, Miami Spice.

Lastly I added little berries in Siren Song ink color. You can skip adding those and go with sequins or enamel dots or some other embellishment for your project, but I wanted to keep this card absolutely one layer so I added stamped berries instead.

Have fun stamping!

Featured Supplies

For your convenience, here is a list of the featured supplies used on today's project(s), along with links to purchase. Please note: this list may contain some affiliate links.

WPlus9 Spring Blooms Stamps
Shop at: WP9
Wplus9 Bold Banner Greetings Stamp
Shop at: WP9
WPlus9 Miami Spice Dye Ink
Shop at: WP9
WPlus9 Sweet Nectar Dye Ink
Shop at: WP9
Wplus9 Siren Song Dye Ink
Shop at: WP9
WPlus9 Warm Wool Dye Ink
Shop at: WP9
Neenah 110 Lb Solar White Cardstock
Shop at: SSS | AZ

Tuesday, May 30, 2017

Analogous Watercolors and Copics with Kelly

Hello Crafters! When I'm struggling for ideas I have several ways of trying to find new ideas but my go to is Pinterest. The other night I was sucked into the endless universe for hours perusing Pinterest and came across this gorgeous wedding cake.

Credit

I really loved how the Ikat pattern matched the flower colors. It gives the impression of the colors flowing out into the cake and it's beautiful. Immediately, I was like card making time!

This look was really easy to recreate with some watercolor paper and distress inks. I opted not to color the leaves because I loved how the flowers seemed to be melting into the background and wanted to keep the focus on them.

You can watch me create this card in the video below.


Watch above or watch in HD at YouTube

One of the things that makes this card work so well is the colors. Because they are analogous (next to each other on the color wheel) I didn't have to worry about them getting muddy. Though I do think the leaves being colored would be super pretty, sometimes it's nice to make something different.

How do you find new ideas? What's your go to inspiration?

Thanks so much for visiting!

Featured Supplies

For your convenience, here is a list of the featured supplies used on today's project(s), along with links to purchase. Please note: this list may contain some affiliate links.

Wplus9 Modern Anemones
Shop at:
Wplus9
Wplus9 Modern Peonies
Shop at:
 Wplus9
Canson MONTVAL WATERCOLOR 9x12 Pad
Shop at:
SSS
Sakura WHITE GELLY ROLL Medium Point Pens Set
Shop at:
SSS
EK Success WRITING PEN FINE TIP
Shop at:
SSS
Fiskars PREMIUM CUT LINE Paper Trimmer 12 Inches
Shop at:
SSS
Tombow MONO MULTI Liquid Glue
Shop at:
SSS
Martha Stewart SCORING BOARD
Shop at:
SSS
Ranger Inkssentials Non Stick CRAFT SHEET
Shop at:
SSS
Simon Says Stamp LARGE GRID PAPER Pack Pad
Shop at:
SSS
Precision Heat Embossing Tool Gun
Shop at:
SSS
Tsukineko Versamark EMBOSS INK PAD
Shop at:
SSS
Inkadinkado EMBOSSING MAGIC Powder Bag
Shop at:
SSS
Pretty Pink Posh 6MM SPARKLING CLEAR Cupped Sequins
Shop at:
SSS
Pretty Pink Posh 4MM SPARKLING CLEAR Cupped Sequins
Shop at:
SSS
Simon Says Stamp EMBOSSING POWDER WHITE Fine Detail
Shop at:
SSS
Simon Says Stamp Premium Ink Pad INTENSE BLACK
Shop at:
SSS
Tim Holtz Distress Ink Pad PICKED RASPBERRY
Shop at:
SSS
Tim Holtz Distress Ink Pad FOSSILIZED AMBER
Shop at:
SSS
Tim Holtz Distress Ink Pad CARVED PUMPKIN
Shop at:
SSS
3M 2 INCH WIDE POST-IT TAPE
Shop at:
SSS
Ranger Studio Paint ARTIST BRUSHES
Shop at:
SSS
3M Scotch ROLL WHITE MASKING TAPE
Shop at:
SSS
Copic Sketch Marker RV02 SUGARED ALMOND
Shop at:
SSS
Copic Sketch Marker RV04 SHOCK PINK
Shop at:
SSS
Copic Sketch Marker RV09 FUCHSIA
Shop at:
SSS
Copic Sketch Marker C1 COOL GRAY
Shop at:
SSS
Copic Sketch Marker YR04 CHROME ORANGE
Shop at:
SSS
Copic Sketch Marker Y08 ACID YELLOW
Shop at:
SSS
Copic Sketch Marker Y13 LEMON YELLOW
Shop at:
SSS
Copic Sketch Marker Y38 HONEY
Shop at:
SSS
Copic Sketch MARKER YR09 CHINESE ORANGE
Shop at:
SSS
Copic Sketch Marker RV69 PEONY
Shop at:
SSS
Copic Sketch Marker R29 LIPSTICK RED
Shop at:
SSS

Saturday, May 27, 2017

Wedding Wishes With Kara

Hey Guys! Kara here with yet another project featuring the Large Butterfly Frame Die. It's such a versatile die and I haven't tired of exploring all of the many ways it can be used. This time I've stamped and colored on the die cut as well as added a drop shadow.

It's no secret that I love a lot of white space, but there has to be an element that pops and makes it interesting. On this card it's the colored images. I die cut the butterfly frame first from white cardstock. I then stamped the Modern Anemones strategically on the die cut. I colored the flowers and leaves with Copic markers {R24, R29, R59, YG61, YG63, YG67} and coated them with clear Wink Of Stella. A little bit of shimmer is in order for a wedding card!

I wanted to add a drop shadow to the butterflies, but not to the outer frame. I die cut the butterfly frame from black cardstock and then carefully snipped the frame off. What I was left with was just the five connected butterflies. I was able to off set them slightly behind the white frame and adhere it with some tiny glue dots.

I stamped the Wedding Wishes sentiment, from Modern Peonies, in the center. I adhered the frame to a white card base using dimensional adhesive.

A simple yet striking wedding design. I hope my friends will love it. They are getting married in September.

Thank you so much for stopping by!

Featured Supplies

For your convenience, here is a list of the featured Wplus9 supplies or equivalents used on today's project(s), along with links to purchase.

Connect with us:

Follow Us on Pinterest