Saturday, October 4, 2014

Holiday 2014 Release Night

Tonight's the night. All of the new products we've been showcasing this week will be available for purchase at www.wplus9.com as well as at many of your favorite retailers. But before they officially go on sale, we still have lots more to share with you.

I am having so much fun with these new stamps and dies. These first two cards feature the Winter Woodland stamps and dies along with the Landscape Borders Die.

I just love the images in this set. I am a huge fan of silhouette art and these look just as amazing in black and white as they do in color. I stamped all of the main images in black and added accents of red for interest.

To create the "snow", I added a little circles of embossing paste using a Heidi Swapp stencil. Like yesterday, I sprinkled some clear glitter embossing powder onto the paste while it was wet and then heat embossed it once the paste dried.

I used the Landscape Borders Die to create a couple of snow drifts at the bottom of the card. I am going to get a lot of use out of this die all year long. There are three styles of borders that can be used for several types of horizons - water, snow drifts, grass hills or even clouds.

In this next card, I wanted to the focus to be the birch trees. So I inked up the trees using Lake House and Ocean Drive dye ink.

To add some sparkle, I stamped the snowflake cluster several times using a glue pad and then sprinkled them with Tim Holtz Rock Candy glitter.

These products are just perfect for creating little scenes and can be use beyond christmas. I'll be sharing some ideas for fall and spring scenes a little later.

Next up is the Holiday Apertures Die. I've already used this die on several of the projects I've showcased this week. There are four dies nested together in this die, you can leave them connected or separate them to open up so many possibilities. This card features the inner three dies used together.

The inner most die does not have a cutting edge around the perimeter, but instead created these tiny trees cut outs and can be used alone, with the other dies in the set or with and open centered dies you may already have as well. (And the remaining little trees that are cut out are perfect for using as confetti or sequins when cut from foil paper to use in a shaker card!)

I added strips of double-sided tape across the base of my card, lining them up with the tree cut outs, and then sprinkled glitter over each so that the glitter would show through each of the die cut trees.

The solid strip between the two groups of trees is perfect for adding a sentiment. All of the sentiments in Strictly Sentiments 6 are scaled to fit perfectly in this space. But, I wanted to use a more organic font for this particular design, so I decided to use the Hand Lettered Holiday stamps and die.

I think this one is one of my favorites so far.

You can also use other dies inside of the mat that the center two dies create. In this next card, I used the two center dies along with the Snowflake Trio Die.

I did some partial die cutting by cutting only the top half and bottom half of the snowflake.

I lifted the die cut portions slightly and added a little Tim Holtz Rock Candy glitter to the tips of the snowflake. For the sentiment, I stamped and hand trimmed the "love" banner from Snowflake Backdrops and adhered it to the center.

I finished it off by adding the panel to a white card base using foam tape for a super clean and simple design. Love.

I have one more to share with you today. This one features the Twenty Fifteen stamp set.

I stamped the solid triangles in Flamingo, Ocean Drive, and Old Gold dye ink on a White panel. I then added my sentiment heat embossed in gold, a few splashes of gold using Heidi Swapp Color Shine and a stag head using the Stag Trio Die. I love mixing the high shine metallic gold with the matte finish of the Old Gold dye ink.

This set has so many possibilities. I specifically kept the graphics in this set neutral and added a few sentiments that makes this set useful beyond the New Year. I have more to share with this set as well as a ton of ideas I'll be sharing in the coming weeks.

Here is a quick recap of all of the new products we are releasing tonight.

Holiday 2014 Release - available 10/05/14

Photopolymer Clear Stamps

Merriest Wishes
4x6" Clear Stamp Set
$14 USD

Merry Little Christmas
4x6" Clear Stamp Set
$14 USD

Winter Woodland
4x6" Clear Stamp Set
$14 USD

Snowflake Backdrops
4x6" Clear Stamp Set
$14 USD

Snowflake Backdrops
4x6" Clear Stamp Set
$14 USD

Twenty Fifteen
4x6" Clear Stamp Set
$14 USD

Strictly Sentiments 6
3x4" Clear Stamp Set
$6 USD

Hand Lettered Holiday
3x4" Clear Stamp Set
$6 USD

Steel Rule Dies

Hand Lettered Hello Die
$6 USD

Holiday Apertures
$16 USD

Landscape Borders Die
$12 USD

Snowflake Trio Die
$7 USD

Stag Trio Die
$12 USD

Winter Woodland Companion Die
$9 USD

More Design Team Inspiration

It's World Card Making Day and several of the ladies will be posting new projects throughout the day in celebration! So be sure to stop by and visit them often while you craft today for tons of inspiration!

Giveaway Alert

Would you like to win the Winter Woodland stamp set, the Winter Woodland Companion Die and the Holiday Aperatures Die before you can buy them? Just leave a comment below by 10:00 p.m. EST on 10/04/14 to enter. I will select one random winner from all comments. Winner will be posted on our Releaser Winners page by 11:00 p.m. EST.

I really hope you guys have enjoyed this release so far. Thank you so much for all of the support, enthusiasm and kind comments!

Friday, October 3, 2014

Holiday 2014 Release - Let It Snow

Hello, and welcome back to our Holiday 2014 Release! We are right in the middle of previewing all of our newest products that will be available starting October 5, 2014 at wplus.com as well as at many of your favorite retailers.

Let's face it, Holiday card making is all about mass production. Sure, we make some originals for those recipients who we know will hold on to their cards for a while. But for the bulk of cards, we usually pick one or two designs and create them in mass. So today, I'm sharing some great candidates featuring the new Snowflake Backdrops set.

The reverse background included in Snowflake Backdrops makes creating a quick card a snap. I started by stamping it in Silver Lining PURE COLOR Dye Ink on to White Cardstock.

To give it that "WOW!" factor, I pressed a Versamark pad directly on to the image, covered it with clear glitter embossing powder and heat embossed it.

I added a quick stag die cut using the new Stag Trio Die and a sentiment from Winter Woodland and called it done.

And here is another version.

This time I stamped it in Lake House PURE COLOR Dye Ink and added a snowflake using the Snowflake Trio Die.

I just love how from one angle it looks like frosted glass.

And then when the light hits it...that iridescent shimmer is amazing!

You could simplify these even more by leaving off the die cuts. The effect in real life is so impactful that it can really stand on it's own. If you do add the die cuts on top, you'll want to use a strong adhesive that will adhere to the glittered embossing. I used Teariffic Tape on the the stag and Glossy Accents for the snowflake. Both held up well.

This next one appears much more intricate than it really is.

I started by heat embossing the haloed snowflake images in white on to White Cardstock. I rubbed Distress Ink in Broken China over the snowflakes using a blender tool. I concentrated the ink around the flakes and faded it out around the edges.

Get ready for the fun part...

Check out that shine! I then misted it with a clear shine mist spray that I am currently testing. I am really impressed with the samples so far. Hmm...what do you think? You like?

I finished it off with a simple gold embossed sentiment using Heartfelt Holiday, a little thread and a few sequins.

Glittery not your style? How about a little eclectic number in a fun color palette?

Simple and fun. I stamped a few of the snowflakes in Flamingo and Wild Mango PURE Color Dye Ink. I layered a stag head using the Stag Trio Die and added the sentiment from Snowflake Backdrops.

I've got one more to show you today. Another easy card perfect for mass production.

I started by stamping the haloed snowflakes in White Pigment Ink onto a Dove Grey cardstock panel trimmed down to 3 3/4 x 5". Since this I used pigment ink, I gave it a little time to dry and then added the stitched lines around the edges using the Holiday Aperatures Die.

I added the sentiment from Snowflake Backdrops and adhered the panel to a Dove Grey card base using foam tape. Another classic and elegant design that is quick and easy to execute.

That's it from me for today, but the Design Team has more to share with you as well.

More Design Team Inspiration

Giveaway Alert

Would you like to win the Snowflake Backdrops stamp set and the Snowflake Trio Die before you can buy them? Just leave a comment below by 10:00 a.m. EST on 10/04/14 to enter. I will select one random winner from all comments. Winner will be posted on our Releaser Winners page by noon.

Good luck! And as always, thank you so much for stopping by and I hope to see you again tomorrow for even more previews!

Thursday, October 2, 2014

Holiday 2014 Release - Going Stag

Are you ready to see more of the new Wplus9 Holiday 2014 Release? If you are just joining us, don't forget to check out yesterday's post to see all of the new products we will be releasing on October 5, 2014.

We have a lot of great new dies coming your way. And not only are they amazing on their own, they work beautifully together as well. Today, I've three more cards to share featuring the Stag Trio Die, the Snowflake Trio Die and the Hand Lettered Holiday Die.

I am completely in love with these dies. They make pulling together a quick sophisticated card so easy. I especially love them cut from metallic foil paper like I've done here.

I started this card by stenciling some modeling paste onto Dove Grey cardstock using a Tim Holtz stencil. I also added a little splatter using a paint brush and Distress Paint in Picket Fence. These two elements paired together really create the suggestion of movement and snow.

To create my focal point, I die cut the Snowflake Trio Die from White cardstock, covered them with Multi Matte Medium and then sprinkled them with Tim Holtz Rock Candy glitter. I layered the deer cut from gold foil on top. To give the foil a little more heft, I die cut the deer from white cardstock first and then glued the two together using Multi Matte Medium.

To finish this card off, I added some thread, a few Pretty Pink Posh sequins in Sand and a sentiment from Heartfelt Holiday embossed in Gold.

Next up, I have another grey and white combo. I am really loving this combo lately. I really like adding texturing to this color combination using embossing paste. So I employed another Tim Holtz stencil for this one.

This time I added some clear glittered embossing powder over top of the embossing paste while it was still wet. I then heat embossed it after the paste was dry to melt it on so that it would harden to the modeling paste and stay in place.

To tie in the glitter from the background, I die cut the "merry" sentiment from Hand Lettered Holiday and covered it with Tim Holtz Rock Candy glitter. I don't know about you, but I always seem to use a lot of glitter when it comes to Holiday cards.

I added a few red sequins and a little red Stickles for a "nose" to add a little pop of color. You could easily leave this out if you wanted to keep it sophisticated. I just liked the touch of whimsy it added. Finally, I stamped the "Christmas" sentiment from the Hand Lettered Holiday stamp set on the inside of the card to complete the message.

I have one more card for you. This one uses the deer head included in the Stag Trio Die along with the "joy" sentiment from the Hand Lettered Holiday Die.

To create the background, I created a smooth gradient using watercolors and added some splashes in gold and white using Heidi Swapp Color Shine and Tim Holtz Distress Paint in Picket Fence. I then die cut the stitched panel using the Holiday Apertures Die.

Just look at that shine! Foil paper = my new holiday obsession!

Again, I used a lot of the same elements as the last two cards. Once I got started with these it was hard to stop. It's kind of like they were all made for each other. ;o)

Like yesterday, I have several more cards featuring these products and I will be sharing them all with you in the upcoming days. But for now, how about a little giveaway?

Giveaway Alert

Would you like to win the Stag Trio Die, the Snowflake Trio Die, and the Hand Lettered Holiday Die before you can buy them? Just leave a comment below by 10:00 a.m. EST on 10/03/14 to enter. I will select one random winner from all comments. Winner will be posted on our Releaser Winners page by noon.

Design Team Inspiration

  • Joni Nina Andaya - Make sure to visit Joni to see what she's cooked up.
  • Kara Vrabel - Kara is showing you a fun way to pair Festive Greetings with Merry Little Christmas for a graphic spin.
  • Maureen Merritt - And be sure to stop by and see Maureen who is also featuring Festive Greetings today over on her blog.

I hope you are enjoying the previews so far. Good luck and thanks for stopping by!

Wednesday, October 1, 2014

Holiday 2014 Release Preview

Are you ready for the Wplus9 Holiday 2014 Release? We have lots of new products hitting the stores on October 5, 2014. But before they officially go on sale we are going to spend the next couple of days previewing all of the new stamps and dies and showing you some fun ways to use them. You can find all of the new products at the bottom of this post.

Remember, the entire Holiday 2014 release will be available for purchase beginning October 5th at wplus9.com as well as at many of your favorite retailers.

We have two new sets that are a little different from our usual style. I don't normally do "cute". I can illustrate it, but I usually have trouble executing the images into a card design. So, I decided to tackle those first. You know? To get them "out of the way" in case I had trouble.

Oh how wrong I was!

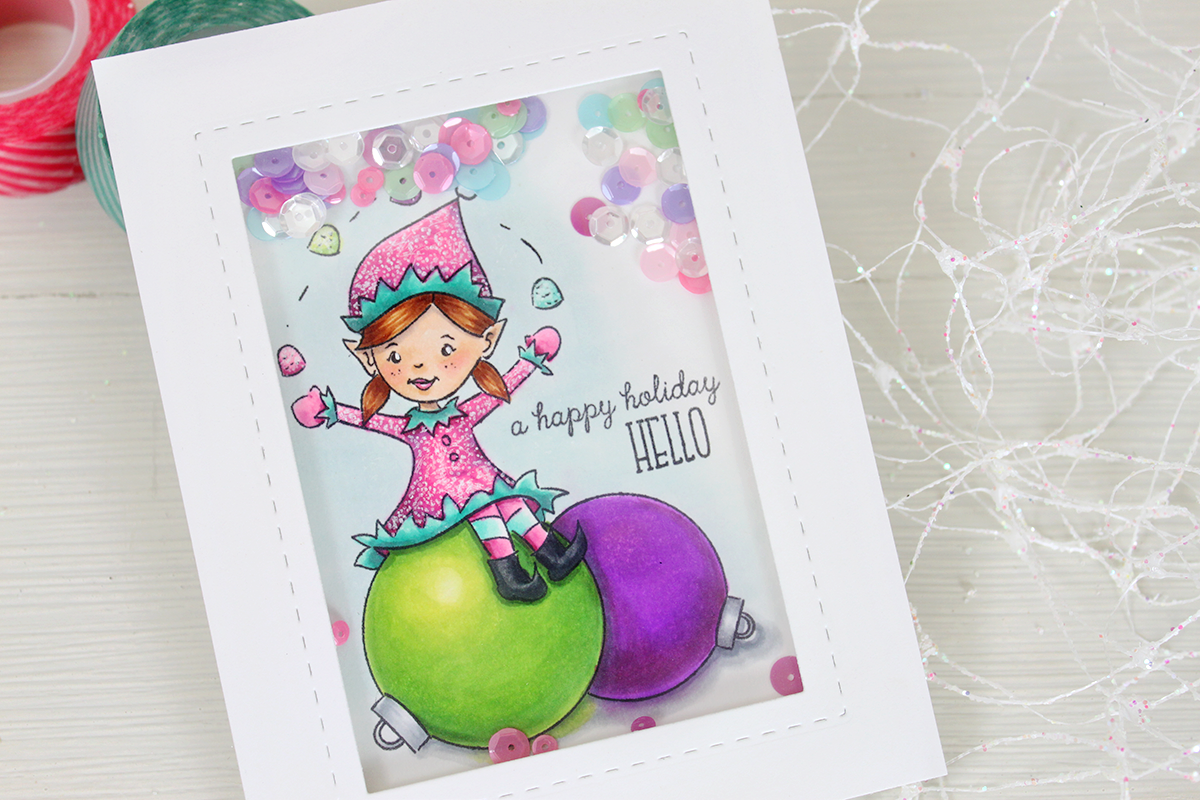
I had SO much fun with Merry Little Christmas and Merriest Wishes! These sets feature three elves - Rebecca Elf, Hunter Elf and Carter Elf - they are a playful little bunch and a blast to color. I used Copic markers for both of my examples today.

I colored Rebecca Elf in bright colors for a non traditional Christmas color scheme. I decided she needed a little sparkle to her outfit and used a white gel pen to add a "sequin" shimmer.

I decided to go with the playful vibe of the image and turn this into a shaker card using a ton of Pretty Pink Posh sequins. This was super easy thanks to the new Holiday Apertures Die also being released. I did not have this use in mind when I designed this die, but let me tell you...this is one versatile die!

Wouldn't this be a fun Holiday card for a little princess?

Next up, a fun card in traditional colors featuring Hunter Elf. I stamped the main image of Hunter sitting on an ornament, masked him and then added several more ornaments using the single ornament stamp included in the set.

Again, I colored everything using Copic markers and added some shimmer to the large red ornament using a clear Wink of Stella pen. It's not really showing up too well in the photos, but it is so pretty in real life and really adds the extra little "something" to the design.

I finished the card off with a sentiment also included in this set and adhered the panel directly to a Cupid's Bow card base. This font combo is one of my new favorites. It can easily go from cute and playful to more modern and trendy.

I have one more card to share with you today. This one features the Festive Greetings stamp set paired with more Copic coloring.

This is another one of those sets that can stretch across several genres. Today's example is bright and colorful.

I started by stamping the main large "Jingle" sentiment and then stamped the separate string of lights directly over it. Next I stamped three additional single bulbs on separate paper and colored them. I cut them out, adhered them over the bulbs that were overlapping the greeting, and finished coloring the rest of the bulbs. I wanted the lights to look entwined in the sentiment. Looking at the photos, I probably should have left the blue bulb behind the "J".

To help reinforce the look of a "glow", I used a Q-Tip to apply a very light halo of chalk pastels around each bulb in their respective colors. The finished panel was adhered to a Black card base. Flat and perfect for mailing!

I really hope you enjoyed today's cards. Sometimes going outside of your comfort zone can be a lot of fun! I'll have more featuring these sets, including a video, a little later this week. If there's anything you'd like to see a video on or more information about the featured cards today, be sure to leave it in the comments below.

I'll be back tomorrow more to share!

Design Team Inspiration

  • Kara Vrabel - Be sure to stop by and see Kara Vrabel, she is featuring several of the new release items, including Winter Woodland and Snowflake Backdrops - demonstrating how well everything can be used together.
  • Joni Nina Andaya - And Joni is sharing more of Merriest Wishes and Merry Little Christmas!

Holiday 2014 Release - available 10/05/14

Photopolymer Clear Stamps

Merriest Wishes
4x6" Clear Stamp Set
$14 USD

Merry Little Christmas
4x6" Clear Stamp Set
$14 USD

Winter Woodland
4x6" Clear Stamp Set
$14 USD

Snowflake Backdrops
4x6" Clear Stamp Set
$14 USD

Snowflake Backdrops
4x6" Clear Stamp Set
$14 USD

Twenty Fifteen
4x6" Clear Stamp Set
$14 USD

Strictly Sentiments 6
3x4" Clear Stamp Set
$6 USD

Hand Lettered Holiday
3x4" Clear Stamp Set
$6 USD

Steel Rule Dies

Hand Lettered Hello Die
$6 USD

Holiday Apertures
$16 USD

Landscape Borders Die
$12 USD

Snowflake Trio Die
$7 USD

Stag Trio Die
$12 USD

Winter Woodland Companion Die
$9 USD

Giveaway Alert

So what do you think? Would you like to win the Merry Little Christmas and Festive Greetings stamp sets before you can buy them? Would you like to see more sets like these from Wplus9 in the future? Just leave a comment below by 10:00 a.m. EST on 10/02/14 to enter. I will select one random winner from all comments. Winner will be posted on our Releaser Winners page by noon.

Good luck and thanks for stopping by!

Connect with us:

Follow Us on Pinterest