Sunday, October 4, 2015

October 2015 Release Week: Day 4

Tonight is the night! All of the products we've been sharing will be available for purchase at wplus9.com as well as at many of your favorite retailers tonight at midnight.

If you are just joining us, you can catch up on Day 1, Day 2, or Day 3, and you will find a complete recap of all of the new products at the bottom of this post.

I'm so excited to be posting on the blog today because I am completely in love with the new Amaryllis stamp set.

I loved the flowers so much in fact that I wanted my bouquet to fill my entire card. I used very minimal masking to build up my image before watercolor them with distress ink. Watch below to see exactly how I did it.

On a side note, I totally lied about the name of the banner. It's actually the Basic Banner die. I should double check things before I start my voiceover.

I also did a copic colored card with this set on my blog if you'd like to head over and see.

As promised, here is a recap the entire release.

October 2015 Release - available 10/05/15

Photopolymer Clear Stamps

Christmas Greetings
3x4" Clear Stamp Set
$6 USD

Christmas Nutcracker
4x6" Clear Stamp Set
$14 USD

Drummer Boy
4x6" Clear Stamp Set
$14 USD

Holiday Boughs
4x6" Clear Stamp Set
$14 USD

Holiday Cheer
4x6" Clear Stamp Set
$14 USD

Holiday Hugs
3x4" Clear Stamp Set
$6 USD

Amaryllis
4x6" Clear Stamp Set
$14 USD

Steel Rule Dies

Anastasia Tag Die

$18 USD

Christmas Nutcracker Companion Die

$20 USD

Drummer Boy Companion Die
$20 USD

Holiday Boughs Companion Die

$10 USD

Holiday Cheer Companion Die
$14 USD

Holiday Hugs Companion Die
$8 USD

PURE COLOR Enamel Dots

Autumn Splendor-Blue
Enamel Dots
$4 USD

Autumn Splendor-Red
Enamel Dots
$4 USD

I hope you'll head out and visit the other awesome design team members too!

Design Team Inspiration

Check out what the rest of the girls have in store for you:

Giveaway Alert

Would you like to win a $25 store credit to wplus9.com? Just leave a comment below by 10:00 p.m. EST tonight, 10/04/15 to enter and I will select one random winner from all comments. Winner will be posted on our Release Winners page by midnight on 10/04/15.

Thanks for stopping by! There is still much more to see, and Dawn will be here tomorrow with more inspiration featuring this awesome release!

Saturday, October 3, 2015

October 2015 Release Week: Day 3

Welcome back to the October 2015 Release! We are continuing to share inspiration featuring our new holiday products that will be available for purchase beginning October 5, 2015. If you are just joining us, you can catch up here with Day 1 and Day 2.

Get ready for the cute!

Holiday Boughs
4x6" Clear Stamp Set
$14 USD

Drummer Boy Companion Die
Steel Rule Die
$20 USD

Holiday Hugs
3x4" Clear Stamp Set
$6 USD

Holiday Hugs Companion Die
Steel Rule Die
$8 USD

Drummer Boy has stolen my heart. These images were so much fun to illustrate and I just love the classic theme. Plus, it's just cute!

For my first card, I used it in a straight forward way to create a mini scene with baby Jesus.

I colored my images with Copics and then die cut them using the companion dies. The soft watercolor background is the perfect backdrop for the fun bright coloring.

I also wanted to show you how versatile this set is. Hey, I'm in Florida, so the palm trees just had to be used. I stamped them repeatedly across my background using Black PURE COLOR Dye Ink and then watercolored them with Gansai Tambi watercolors.

I added the "Warmest Winter Wishes" sentiment from our Winter Pals stamp set on the Basic Banners Die. I of course, I had to add a few presents as well using the Holiday Hugs stamp set.

Yes, we are tacky like that and wrap the palms with Christmas lights! I just hand drew a few wrapped around my trees and added a little glossy accents for some shine.

While I had the Winter Pals stamp set out, I went ahead and paired them with Holiday Hugs as well.

I started the background by sponging some Broken China Distress Ink onto some Tim Holtz Watercolor card stock and then added a few water droplets a la Kristina Werner. I then stamped the adorable bear and little girl image, watercolored it with Distress Ink and die cut them.

To anchor them, I stamped and die cut the block of ice from Winter Pals and heat embossed my sentiment from the same set.

And finally, I just can't get enough of these all over backgrounds. I die cut several of the images from Inkadinkado Stamping Mask Paper and created my pattern on my card stock panel. I then sponged Broken China Distress Ink over the entire background, removed the masks and stamped the images into their respective spaces.

Even if coloring is not your strong suit, these images look great with minimal coloring. Super easy!

Design Team Inspiration

Are you ready to see what the design team has been up to? Check out what the girls have in store for you:

Giveaway Alert

Would you like to win a $25 store credit to wplus9.com? Just leave a comment below by 10:00 a.m. EST on 10/04/15 to enter and I will select one random winner from all comments. Winner will be posted on our Release Winners page by noon on 10/04/15.

Thanks for stopping by! I really hope that you're enjoying the release so far. Kelly will be here tomorrow to feature a gorgeous set that is perfect for Copics and watercoloring!

Friday, October 2, 2015

October 2015 Release Week: Day 2

Hello everyone, welcome back to the Wplus9 October 2015 release. It's Joni, and I'm here to introduce the new stamp set and dies that I designed - Holiday Hugs and the Anastasia Tag Die.

Holiday Hugs
3x4" Clear Stamp Set
$6 USD

Holiday Hugs Companion Die
Steel Rule Die
$8 USD

Anastasia Tag Die
Steel Rule Die
$18 USD

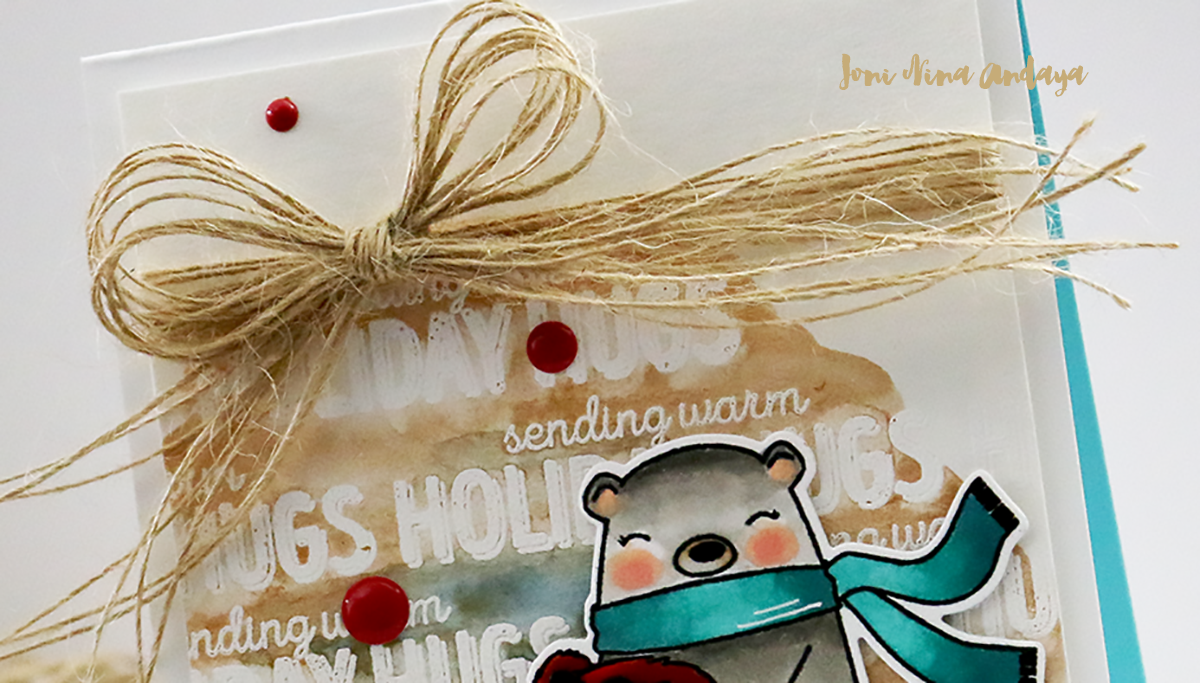
To begin my card I first white heat embossed the sentiment from Holiday Hugs.

Next,  I watercolored the sentiment panel let it dry and added the new Red enamel dots from Wplus9. Then I stamped the stamp image on a regular white cardstock, colored with Copics, and die-cut the image with its coordinating die. I added the foam tape on the back of the die-cut then adhered.

Next, I added some twine at top of the card to finish off the card.


For my second card, I stamped the birch tree using from an old time favorite set Winter Woodland and distressed the background with Distress ink pad in Evergreen Bough after masking the trees.


Once the whole top panel dried, I stamped the sentiment "sending warm Holiday Hugs" in Versamark ink, and heat set it with gold embossing powder.


Next, I die-cut other white cardstock piece using Landscape Border dies to create the white slope behind the bear and the girl. For the final touch I added some liquid pearls in white opal of the dimension of snow on the card.

For my final project of the day, I created a tag using the new upcoming Anastasia dies with Holiday Hugs stamp set. I first die-cut the tag without the die-cut center and distress the center with Distress ink in Peacock feather. Then I die-cut another tag this time with coordinating oval center die to create a window for the image.

Next, I stamped the bear and the girl on a white cardstock colored with Copics and die-cut. I adhered the bear/girl with foam tape for added dimension along with the window tag on top of the other. I also added some die-cut boughs from the new upcoming Holiday Boughs stamp set. For the sentiment I white heat embossed on black cardstock, cut, and adhered on top of the tag.  I added some new Wplus9 red enamel dots on top of the die-cut bough to finish off the card.

I hope you guys enjoyed these new products. Let's see what the rest of the design team has been up to!

Design Team Inspiration

Giveaway Alert

Would you like to win a $25 store credit to wplus9.com? Just leave a comment below by 10:00 a.m. EST on 10/03/15 to enter and I will select one random winner from all comments. Winner will be posted on our Release Winners page by noon on 10/03/15.

Thanks for stopping by! Be sure to stop by again tomorrow to see more of what Dawn's been doing with these new products!

Thursday, October 1, 2015

October 2015 ReleaseWeek: Day 1

Welcome to our October 2015 Release week! It's finally time to unveil all of the new products hitting the stores on October 5, 2015.

Before they officially go on sale, we are going to spend the next couple of days previewing all of the new goodies and showing you some fun ways to use them. Remember, the entire October 2015 Release will be available for purchase beginning October 5th at wplus9.com as well as at many of your favorite retailers.

It's no secret that I love graphic images. Pair them with anything hand drawn or hand lettered, and I'm in heaven! I'm going to kick things off today with a look at the Holiday Boughs stamps and dies, along with the Christmas Greetings stamp set.

Holiday Boughs
4x6" Clear Stamp Set
$14 USD

Holiday Boughs Companion Die
Steel Rule Die
$10 USD

Christmas Greetings
3x4" Clear Stamp Set
$6 USD

My first card today is a perfect example of what I envisioned when I was illustrating this set.

I stamped the large solid bough several times. To get the variation in color, I inked my stamp up with Appletini dye ink, stamped it off a couple of times and then immediately inked it in Fairy Dust dye ink and started stamping. Each time I re-inked with Fairy Dust, the color started to turn gradually more gray. I have become addicted to stamping with "dirty" stamps lately. I just love the cool color mixes you can get.

I added the large outlined bough in Black and then stamped a few "berries" in Gala Red. A little glossy accents on the berries and the large sentiment finish it off. I just love the large scale of this sentiment. To continue my sentiment, I used a little help from our Heartfelt Holiday stamp set and the Basic Banners Die.

Next up, I decided to pair the Christmas Greetings stamp set with Holiday Boughs. The font is this set makes it a perfect classic go-to sentiment set for the holidays.

For the background, I used the Gansai Tambi watercolors to paint directly onto the boughs and then stamped them onto Tim Holtz watercolor cardstock. I love the way these sentiments looks heat embossed, especially in gold. I stamped and die cut a few of the boughs and pine cones and added a little Rock Candy Distress Glitter for some shine.

I added these to the card on a panel die cut from our Gift Card Layers Die and adhered it with foam tape.

I decided to use the same products and create another version of this card. This time I used the other large script sentiment included in Christmas Greetings and embellished the card with a few of our new enamel dots from the Autumn Splendor-Blue Enamel Dots.

I have one more to share with you today. I wanted to show you how well Holiday Boughs works with the Botanical Bunch stamp set.

I do love a little white heat embossing with watercolor. After I heat embossed the images onto Tim Holtz Watercolor Cardstock, I added some very loose washes of color with the Gansai Tambi watercolors. To create my focal point, I used the Timeless Tags 2 Die to die cut a tag from vellum. The sentiment was created using the Hand Lettered Holiday Die and stamp set.

And of course, a few Pretty Pink Posh sequins were the perfect finishing touch.

That's it for me today, but, there is still a lot to see.

Design Team Inspiration

Are you ready to see what the design team has been up to? Check out what the girls have in store for you:

Giveaway Alert

Would you like to win a $25 store credit to wplus9.com? Just leave a comment below by 10:00 a.m. EST on 10/02/15 to enter letting me know what your favorite Christmas theme is and I will select one random winner from all comments. Winner will be posted on our Release Winners page by noon on 10/02/15.

Thanks for stopping by! Be sure to stop by again tomorrow to see Joni's newest addition to the Wplus9 family, it's a cutie!

Connect with us:

Follow Us on Pinterest