
Hello! Today, I've got a labor of love for you. Yep, no sugar coating it here. LOL You all know that I'm a slow colorist, so this beauty was definitely a long one for me.

And it was worth every hour! I worked on coloring these images over several nights while catching up on some TV, and in truth, it probably took me about 5 hours to color everything. I didn't time it, but that's my best guess.
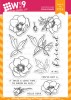
I stamped out several of the images from our Modern Peonies, Modern Anemones, and Modern Petunias stamp sets in Antique Linen Distress Ink on Neenah Solar White 80 lb Ultra Smooth cardstock - and got lost in coloring with Copic markers.
I did want to share a little of my process with you all. Since I've shared several versions of the florals, I decided to share how I approached coloring the leaves. Fair warning - it's a longer video and I did struggle a bit with voicing it over. I'm not sure why, but it is difficult for me to articulate what I'm doing when it comes to Copics.
Hopefully you will be able to pick up a few tips from the video none-the-less. And remember, there is no "right" way or "wrong" way, just the way that works for you!
I didn't keep track of the colors I used. When it comes to coloring florals, I rarely do. I've tried. I usually start out good...then, intuitively I will grab a random marker and forget to write it down and then remember 3 colors later...and well, yeah, you know how that goes. But, if there is a particular one, that you'd like me to create a video for, just leave it in the comments below and I will try to work it into a future video.

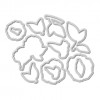
After I colored everything, I used their companion dies to die cut everything. I die cut a circle from masking paper and inked through it with Warm Wool Pure Color Dye Ink and then over stamped it with a Polka Dot background using Versamark Ink. The Versamark Ink actually "bleaches" our inks when applied over them, similar to the way the 0 Blender Copic marker works.

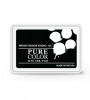
I then stamped my sentiment using our Pure Color Dye Ink in Black and adhered my arrangement of flowers. I adhered some elements directly to the card base and others with foam tape for a bit of dimension.
Thank you so much for stopping by. I hope you enjoyed!

Featured Supplies
For your convenience, here is a list of the featured supplies used on today's project(s), along with links to purchase. Please note: this list may contain some affiliate links.


SWOONING!!!! ♥♥♥
ReplyDeleteIts... Beautiful.!!!
ReplyDeleteThank you for sharing your technique. I'd love to see you use Copics on the flowers as well.
ReplyDeleteYou are so incredibly gifted at art. But you always make me feel as if I can achieve similar results. Thank you for such great tutorials, Dawn.
ReplyDeleteWow. Loved this s. I don't know if I have the patience, but your results are worth the effort! And yes, I'd love to see how you did these flowers, too!
ReplyDeleteHOW ABSOLUTELY GORGEOUS & STUNNING! Your coloring is WONDERFUL!!! I think the Copic people should GIVE YOU their certification!!!! LOL JUST GORGEOUS!!!!!!!!!!!! ;)YES, I would LOVE to see your Copic coloring for ALL of these flowers!!! ;) THANK YOU!!!! ;)
ReplyDeleteOh how I would love to take classes from you! Or be a fly on your wall. Just amazing! I can only wish.
ReplyDeleteI can watch you color forever!! The card is just stunning and yes please do a Copic video on the others Modern Florals please, that would be amazing!! Watercolor scares the crap out of me unless it's very simple :) . Ok, let's be honest your leaf just scared the crap of me now hahahahaha!! Thanks for sharing your process, I might give it a more very simple try!
ReplyDeleteI love to watch you color so the length of your video was just awesome! I would love to see a video on the other flowers that you used on the card. So gorgeous! Thank you!
ReplyDeleteSUPER SUPER gorgeous!!
ReplyDeleteWOW!!!
So beautiful! Thank you for sharing your process with us.
ReplyDeleteI could watch you color forever! I love Copics and I know the layering process takes time, but so worth it and so fun to experiment. You are an expert at colors, IMHO! So, anytime you want to video your coloring, you go gal!!! Thanks!
ReplyDeleteWow. Simply amazing! I could watch for hours... And I, too, would love to see a video of you coloring a flower or two with Copic markers. Thank you for sharing your talent with us!
ReplyDeleteabsolutely amazing Dawn, thank you! thanks for including clear reference to which colours used as well. I would love to see a similar video on colouring the flowers also. I have two of these sets and am keen (but nervous I have to say!) to use them in something like this. again thanks
ReplyDeleteOh, Dawn, I could watch your coloring videos all day! I even had my husband over my shoulder to show him, and he was very interested and amazed. I love how you explained what you were doing and why and how you just use a variety of Copic markers. I was using all kinds and then thought I had to just use a few to share with others to help them. But I love the freedom you give yourself. I need to do that too. Totally exquisite coloring, but the images are amazing and allow for this kind of coloring freedom with the openness of our petals and leaves. I LOVE it all and love your designs! Thanks again for a great video and stunning card! Hugs!
ReplyDeleteI would love to know also how you acheived that shade of blue on the flowers with copics. I struggle to get a really true light blue, as most of the 0's seem to be quite turquoise in colour. can you recall your combination there or does anyone have suggestions?? thanks
ReplyDeleteWOW Dawn, this was just amazing to watch. I think I have learned a few tips here, now if I can just remember them...LOL Seriously, I have pinned it to refer back to, just in case.
ReplyDeleteYour card is gorgeous and I would LOVE to see more Copic videos!