
Jean here, with another post for WPlus9 Design Studio. Today, I have something fun to share that I've been wanting to do for quite a while now.

I was inspired by the incredible DIY party sets and buffets I've been seeing via Pinterest and decided to give it a try. Le Cirque is the perfect set to bring my own to life.

Wplus9 Supplies:
Stamps: Le Cirque, Pile It On, Heartfelt Mix | Cardstock: White, Kraft
Invitation Instructions:
- Design and print invitation details onto white card stock.
- Cut to size. Prep by punching corners etc. at this point if you choose.
- Add stamping and embellishments. I used Hearfelt Mix and Pile It On to make the banner, and Le Cirque for the rest.
- If you have bulky embellishments, you'll need a roomy envelope like the one I've used here. I cut this sturdy envelope using the Silhouette Cameo.

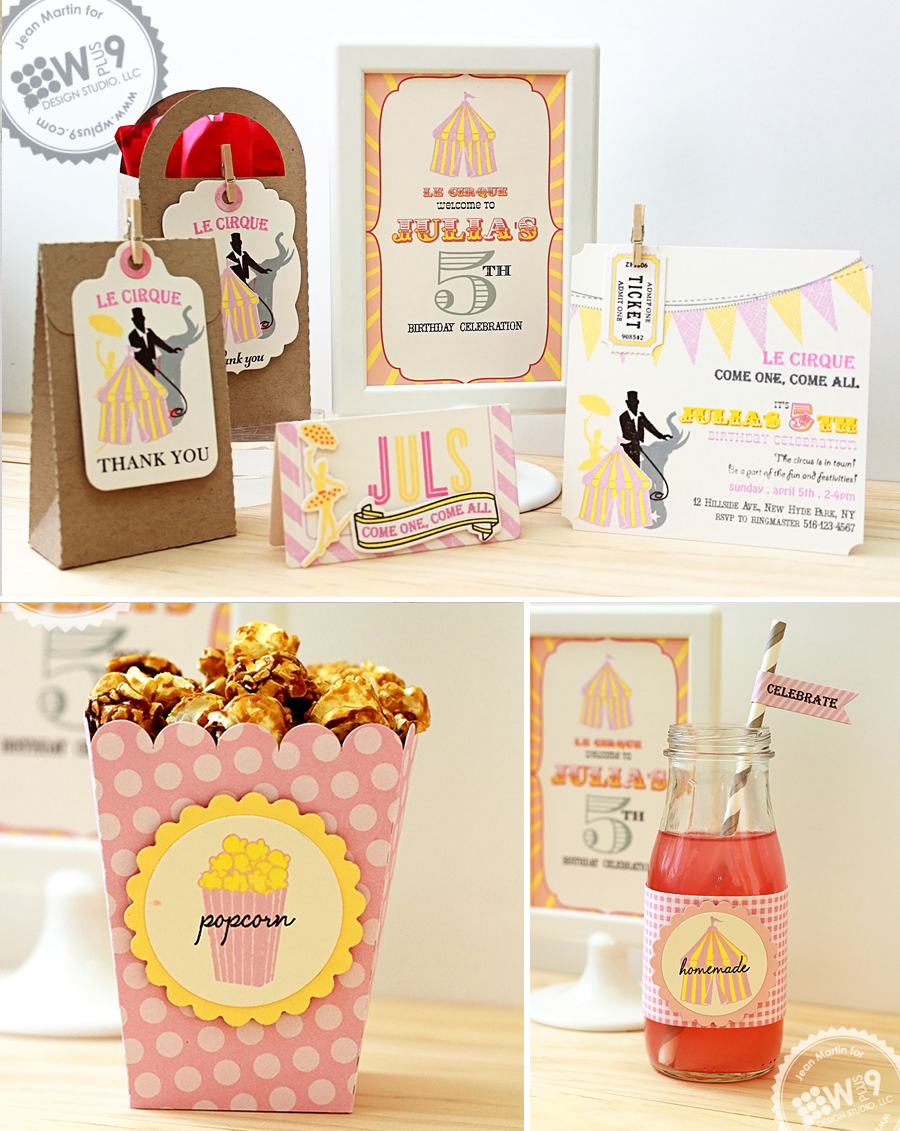
Here's a look at the rest of the set. I made tags for party favors, straw flags, bottle labels, place cards, cupcake toppers, and a party sign. For both the invitation and the party favor tags, I used the masking technique to get the tent, ballerina, ring master, and elephant together that way.
Wplus9 Supplies:
Stamps: Le Cirque, Pile It On, Heartfelt Mix, Bitty Buddy Valentines | Dies: Banner Trio, Le Cirque, Label Layers 2, Clear Cut Stackers: Rounded Rectangles | Cardstock: White, Kraft
The popcorn box was made with my Silhouette Cameo. I just added the cute little popcorn tag to it. Same thing with the cupcake wrap, I wasn't willing to hand cut cupcake wrappers for a party, considering I would probably need 25-50 pieces of it. But the cupcake topper and popcorn tag were pretty easy to make. You can use your Silhouette as well, but I prefer using dies. The edges always come out better that way.

Quick Tip: When apply flags to straws or cupcake picks, make sure to use a strong adhesive like Scor Tape so that they don't fall off prematurely.

To create the place card, I stamped the frame from Bitty Buddy Valentines onto the Clear Cut Stackers: Rounded Rectangles die. Then I just scored it across the middle and folded it before stamping and embellishing it. The party sign in the frame is something that I designed in Adobe Illustrator. I made a blank one that you can download below if you'd like.

Free Download: You can download the blank Party Sign file here.
You can use it on Adobe Photoshop, Illustrator, and Elements. Just type in your own wording in the font that you want.
There you go! A DIY party set! This was such a fun project to make. I hope you will give it a try with your next party. Jill from Greenwood Girl Cards suggested that I make a birthday set: cards, tags, and packaging for my next WPlus9 Design Studio post. This is a start Jill! I'll make birthday packaging my next project when I get back from vacation.
Thanks for stopping by today!


Wow! Gorgeous stuff! Love everything in this post!
ReplyDeleteOh my, this is just amazing! What gorgeous colors, and I can't tell you enough how much I love the way you've grouped all the elements. I love the combo of the lion tamer/elephant/tightrope walker - it is such a great visual! Way to breathe new life into this set, Jean!
ReplyDeleteso beautiful!! i love the colors!
ReplyDeleteWow! I am so impressed with this party set. Amazing colors and details!
ReplyDeleteGreat post. I was checking continuously this blog and I am inspired!
ReplyDeleteVery useful information specifically the closing phase :) I take care of such
information much. I was looking for this certain
info for a long time. Thank you and good luck.
Look at my webpage: windows xp registry cleaner