
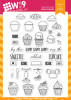
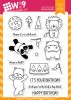
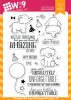
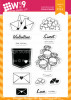
Hey folks! I’m Cynde Whitlow from The Pink Envelope. I am so honored and excited to be on the Wplus9 Blog today! When I was asked to guest design - and after I fan girled a little (maybe a lot) - my mind immediately started planning how I could color those amazing floral images they are so well known for. However, I also thought it would be super groovy to shake it up a bit and put together something a lil out of the ordinary and crazy fun! So, today I’m using Big Deal, Unforgettable, Sweets & Treats, Fresh Preserves and A Pocketful: Valentine to create a Circus Birthday.

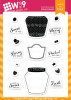
Before I stamped anything I did two things, First, I cut masks from full stick Post-It Notes. Now, I know it’s A LOT folks, but I promise the planning ahead and taking the time to cut them all out is so worth it. Plus you can double up your Post-It Notes and that makes cutting them out super easy. Second, using a T-Square Ruler and a pencil, I lightly traced a line across my panel a little over a 1/4” from the bottom. This will be my guide as I start stamping my images.
Using my MISTI Stamping Tool, I started stamping all of my images in a Copic friendly black ink. Keep in mind folks, when masking, your foreground images get stamped first. The MISTI makes this job easy peasy. For example, I could stamp the lemon/cherry image and the single cherry from Sweets & Treats and the little ball from Big Deal at the same time. These little images seem trivial, but they make for great details on the finished card!

To make sure I would have enough room for my jar, I placed it in my panel and then added the 2 cupcakes from Sweets & Treats where I wanted them. I closed the MISTI door and picked up the cupcakes. Since I knew I would have enough room for the jar now, I stamped more cupcakes from Sweets & Treats and I really wanted to play up the circus theme so I used the lion, the panda and the bear from Big Deal. However, I didn't stamp the panda just yet. I made sure to stagger and spread out my images. I wanted a full card.
I thought the big ball in Big Deal would make a super fab balloon, so I stamped that three times on my panel. I did leave room for the balloon from Unforgettable, because the solid balloon would help give the eye some rest from the patterns on the other “balloons”.

Again, I placed the jar from Fresh Preserves onto the panel. Then, I placed my panda on top of that and since I had room, I placed the lollipops from A Pocketful: Valentine on top of the jar and closed the door of them MISTI to pick them both up. After I was finished stamping those, I placed my jar on to the panel again. This time I was ready to ink it up.
The jar stamp in Fresh Preserves actually has a solid lid on it. I wanted mine to be see through. For starters, the solid black would cover some of my Panda and also, I liked the idea of seeing the lollipop sticks go down into the jar. So to make it look like a jar with no lid, I only inked up the stamp to the point where the jar meets the lid. After I stamped it, I put my jar mask over the stamped image and using a Copic Multiliner, I carefully traced around the top of the mask. Then I removed the mask and added lines where a jar would be threaded.

Then I masked off the panda, his hat, and around the outside of the jar and stamped “gum balls” using the little ball from Big Deal. This seems CUH-RAZY since there are so many. The trick is to cut about 4 masks and then you’re only stamping what will be the most visible. You then make the little gaps in between look like gum balls when you start coloring.
At this point, I did start coloring. I really played up the traditional circus colors and Copic colored all of my images in Red, Yellow and Blue. I wanted to reinforce the idea that these guys are sitting on a counter or table in the midst of the treats, so I just added shadows in Grey Copic’s to ground them and left quite a bit of white.
If you have the Big Top Background the background would be easier yet, but I simply masked of stripes using Post-It Labeling Tape in diagonal stripes and ink blended Wplus9 Gala Red Pure Dye Ink with a Ranger Mini Ink Blending Tool.

The main attraction (ha ha, no pun intended) of this card IS the scene, so I skipped the sentiment and any embellies. I did however use a Sakura Clear Glaze Pen on all of gum balls not in the jar, as well as the cherries. Clear Wink of Stella belongs on every card, so I highlighted the balloons, the icings and the ties on the lollipops. I also used a Sakura White Glaze Pen to reinforce the highlight on the jar as well as the stars and circles in the balloons.
That’s it! Thanks so much for stopping by to see me. A monster thank you to Dawn (& crew) for inviting me to play! This was truly a BLAST! I hope I’ve inspired you to think outside of the box, use up those stamps people and create something fun!
Have a great day folks! ~Cynde
Featured Supplies
For your convenience, here is a list of the featured Wplus9 supplies used on today's project(s), along with links to purchase.


WOW Cynde!!!! This card is AMAZING!!!! Your design is wonderful and your coloring is absolute perfection. Pop this one in a frame and call it a day!! (It's too beautiful to give away!) Well done (& congratulations!). ~HUGS~
ReplyDelete#kindnessmatters
Thank you so much! I'm so glad you like it!
DeleteI agree with Maggie that this card is amazing! So much fun for the recipient, who will get a laugh, not simply a smile from it. Love the bright colors and the entire scene. Thanks for sharing your talent with us today. Have a wonderful day!
ReplyDeleteThank you so much! It was loads of fun to make!
DeleteI think the ladies above have said it ALL!!! LOL WHAT A SUPER AMAZING JOB!!!! GORGEOUS COLORING & PLANNING!!! Something that ANYONE would LOVE to receive! LOOOOOOVE the mix of stamps used on this too!!!!!!!!!!!!!!! SUPER JOB!!!!!!!!!!!! ;)
ReplyDeleteThank you so much! I love an opportunity to use a bunch of different sets!
DeleteWhat an amazing creation this is. I cant stop looking because every time I look in another spot I see something else. Your shadows and details are out of this world, what a masterpiece. Congrats on your Guest post they are lucky to have you..
ReplyDeleteThank you! It was tons of fun to make and I always feel the smallest details can make the biggest difference!
DeleteThis card is amazing! I'm in awe of your ability to pull these different sets together and create this one fantastic scene. I also love the way you brought the whole scene together by using the same color scheme throughout. Truly amazing!!
ReplyDeleteThank you! These are some of my favorite cards to make. It's awesome to work the imagination!
DeleteWow! Your card is fantastic!!!
ReplyDeleteThank you so much! I'm so glad you like it!
DeleteI am impressed with your card. But, at the same time exhausted just thinking about all the work that went into it:) Wow!
ReplyDeleteThank you! Actually, the process is a lot easier than it looks and it's outrageous fun!
DeleteIncredible coloring and masking!!
ReplyDeleteThank you so much!
DeleteThis was a lot of work and would only be for someone very special even if I could give it away. Great card
ReplyDeleteThank you! My kids call these my Journey Cards. They're more about the journey in creating them than the finished product. They are loads of fun to make though and surprisingly easy!
DeleteThis isn't a birthday card...it IS the PARTY! What incredible detail, and stunning coloring. Just WOW!
ReplyDeleteSuch a super fun card!!
ReplyDeleteVos partages me plaient beaucoup! C'est super!!!
ReplyDeletevoyance serieuse gratuite