Hi there, it's Maureen here for day two of the WPlus9 June release. Today I'm sharing a card using the adorable new set - Friends For All Seasons: Summer. This is the next installment in the Friends For All Seasons series, illustrated by Stephany Zerbe. And it is so cute!
AVAILABLE JUNE 5, 2016

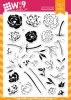
Friends For All Seasons: Summer
4x6" Clear Stamp Set
$15 USD

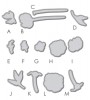
FFS: Summer Companion Die
Steel Rule Die
$14 USD
This set is filled with adorable images and sentiments, and although that little dog may be the "star" of this set, I couldn't resist using the kites to make a super CAS card. Notice that the kite has the outline image and a solid image. This made it quick and easy to add some bright pops of color!

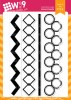
I paired the kite from the set with a couple of oldie but goodies. I used Happy Birds to add in some stylized clouds, and a little border action from Borders & Backgrounds 2 compliments the other images perfectly.
Repeatedly stamping accessory images in a stamp set is a great way to stretch your stash. While the kite is meant to be an accent, here it becomes the focal image. And the beautiful rainbow of WPlus9 PURE COLOR ink pops against the black and white.
There are a lot of great products to introduce this week. I can't wait to see what the rest of the team has created!
Giveaway Alert
Would you like to win a $25 store credit to wplus9.com? Just leave a comment below by 9:00 a.m. EST on 06/03/16 to enter and we will select one random winner from all comments. What do you think the next character in the Friends For All Seasons series will be? Winner will be posted on our Winners page by noon on 06/04/16.