Hello and welcome back to the WPlus9 Design Blog! It's Kara and I wanted to share with you a fun background pattern I created with a few floral stamps from the Happy Wishes stamp set.

I love creating patterns with stamped images. To be honest, I normally just 'eyeball' my patterns. A lot can be corrected by die cutting the panel after it's stamped with a rectangle die. Position the die on the pattern just right and no one will know your pattern came out slightly tilted. ;)
After creating my test pattern for this design, I knew I'd need a few guidelines since the success of this pattern really relies on straight lines and the stamped images lining up just right. I created one vertical and one horizontal pencil line in the center of the card front. Once those main lines were stamped straight, it was easy to keep the rest of the pattern in line. I started with the four Bloomsberry flowers in the center and worked out from there. When all of the ink was dry, I was able to erase those pencil lines.

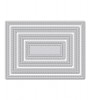
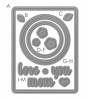
I needed to cover some of the pattern to create a neutral space for my sentiment, however I didn't want to cover it up completely. I used the 4 Bar Stitched Rectangles Die to die cut a piece of white cardstock smaller than the stamped panel. I also used the large circle from the Love Mom Layers die to create a window. This way not only does the pattern peek out from the window, but the fact that the white panel is smaller allows you to see the pattern around the edges as well.
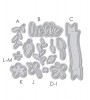
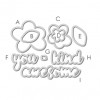
I accented the tiny flowers in the pattern with a black dot using a little stamp from You Equal Kind. The sentiment is stamped on a banner from the Bountiful Blooms Die and finished it off with a few stamped and die cut flowers from the Happy Wishes set.

It's always handy to have a few birthday cards in your stash! Thanks so much for stopping by today. See you next time!

Featured Supplies
For your convenience, here is a list of the featured Wplus9 supplies used on today's project(s), along with links to purchase.