Showing posts with label Wishing You Sentiments. Show all posts

Saturday, May 14, 2016

Galaxy Background with Color Bursts


Hi all, last month I shared this card with you using Ken Oliver Color Burst powder.  Whenever I do technique pieces like that I make a few so I can choose which one I like best for the project I am working on.


While I didn't feel the background featured on my card today looked nice with the Rose Background die, it looks great as a night sky!  This has a more spotty appearance, like a galaxy background.  To achieve this look, you'll want to use less water on your paper before sprinkling on the Color Burst.


I couldn't resist using this galaxy background along with the Wishing You stamps, Sentiments and dies and Starry Background die.  They all just work wonderfully together. 

I hope you'll play with this technique a bit.  Try using different amounts of water and powder to see which look appeals to you most.  Get creative on how you use those backgrounds too!

Featured Supplies

For your convenience, here is a list of all of the supplies (or equivalents) used on today's project(s), along with links to purchase. Please note: this list does contain some affiliate links.


Thursday, August 13, 2015

August 2015 Release Week: Day 4

Hello! It's Day 4 of our August Release and you all have been so patient. But tonight is the night! All of the products we've been sharing will be available for purchase at wplus9.com as well as at many of your favorite retailers tonight at midnight.

If you are just joining us, you can catch up on Day 1, Day 2, or Day 3, and you will find a complete recap of all of the new products at the bottom of this post.

From the looks of the comments, you all are really enjoying this release, especially the cute animals. I'm so happy to hear that because I still have more to share with you today featuring the Wishing You stamp set and die!

My first card features the Momma/Papa bunny and it's little one along with some Copic coloring in a softer style.

Copic coloring can be very bold, and usually is, but these images begged to be demonstrated with a softer, almost airy feel. To keep everything light, I used stippling to create my background. This is very easy and forgiving as you just lay in a light messy wash of your base color and then add dots of darker color. Isn't that sentiment from the "Wishing You Sentiments" set perfect. *Love*

These images also look amazing with a bolder color palette, like this next card. I was going for a sunset (or a sunrise), not sure that I nailed it...but I like it anyway. It uses the new Falling For Blue ink so I'm sold! ;o)

I masked off the hill and sponged on our Flamingo dye ink. I then came in from the top with Bo Peep, layered on Falling For Blue, and finished off at the very top with Nautical Navy. I used a Copic 0 Blender to lift some "stars" out of the sky and around the moon to give it a "glow". Yep, you can use Copics and our inks together and they will react similarly to each other - lift color, blend colors, you name it.

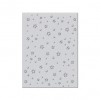
To finish the sky, I added some shimmer using our Shimmer Spray Mist and a few stars from the Starry Background Die. The sentiment was stamped onto our Basic Banners die and I added a little shadow to the folds for some dimension.

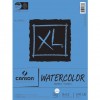
Now, if Copics and sponging are not your thing. These look amazing with a very simple wash of watercolor as well. And I do mean SIMPLE. Like 10 minutes - entire card from start to finish - simple.

I stamped my images onto some Arches Hot Pressed watercolor paper and used my Gansai Tambi watercolors to very crudely and quickly add washes of color. I used very little water. And didn't take any care to create smooth transitions. You can see on the bunny, it's pretty much dry brushed. I personally love this style as a fun and quirky alternative to the more traditional smooth watercolors.

And finially, if you just want to do some good ol' clean stamping. Hey, that looks awesome too!

To create these 4 bar cards I stamped each one out using our Black dye ink. Then I die cut each bunny from fun foam. Yes, that stuff we played with as kids and now use as a cheap sturdy alternative for foam tape.

I attached the fun foam bunnies to an acrylic block using a little tape runner inked them up with our PURE COLOR dye inks and stamped them on their respective images. Now the fun foam die cut will be slightly larger than the outlined image, so I simply offset my stamping. Again, love the quirkiness of it.

I stamped in Bo Peep above and our new Hayride below.

And the last one in Warm Wool. I've tried this several times and you can really change it up by stamping them full strength and intense, or try stamping off once or twice (or more) for a different look. I stamped each of these off once before stamping onto my card.

That is it for me today. But I do have more, so I will be back again tomorrow.

As promised, here is a recap the entire release.

August 2015 Release - available 08/14/15

Photopolymer Clear Stamps

Going Places
4x6" Clear Stamp Set
$14 USD

Autumn Leaves
4x6" Clear Stamp Set
$14 USD

Wishing You
4x6" Clear Stamp Set
$14 USD

Wishing You Sentiments
3x4" Clear Stamp Set
$6 USD

Grateful Greetings
3x4" Clear Stamp Set
$6 USD

Steel Rule Dies

Going Places Companion Die

$18 USD

Autumn Leaves Companion Die

$15 USD

Wishing You Companion Die
$15 USD

Starry Background Die

$15 USD

Gift Card Layers Die
$28 USD

PURE COLOR Dye Ink - available EXCLUSIVELY at wplus9.com

Falling For Blue
Dye Ink
$6 USD

Hayride
Dye Ink
$6 USD

Gala Red
Dye Ink
$6 USD

Warm Wool
Dye Ink
$6 USD

Last Leaf
Dye Ink
$6 USD

Pumpkin Spice
Dye Ink
$6 USD

Design Team Inspiration

Be sure to stop by and see what the design has been up to as well:

Giveaway Alert

Would you like to win a $50 store credit to wplus9.com? Just leave a comment below by 10:00 p.m. EST tonight, 08/13/15 to enter and I will select one random winner from all comments. Winner will be posted on our Release Winners page by 11:00 p.m. EST tonight.

Wednesday, August 12, 2015

August 2015 Release Week: Day 3

Hello Crafters!

It's Kelly here to share a little scene building. All of these adorable critters are simply perfect for this style of card!

For my first card I've used stamps from Autumn Leaves and Going Places. The inks are a combination of Hayride, Gala Red, Last Leaf and Pumpkin Spice Dye Inks, all from the new release. I also used Lake House Dye Ink and the sentiment is from Sweets & Treats

Personally, I love a one layer card. I think there is something truly magical that happens when you mask and stamp and then see how it all comes together to create this scene you envisioned in your mind. I definitely had fall on my mind when putting this one together. How could I not with all those gorgeous inks sitting in front of me?!

I started by lightly sketching out where I wanted my tree to be. This would give me a starting point for my stamping. I used both first and second generation stamping to make my tree and leaf pile really full. I stamped in the new Autumn Splendor inks sometimes inking up with my lightest color and then adding my darkest to blend, or using the rock and roll technique. Every leaf was stamped twice, first in full color and then again second generation. This helps give the tree some depth, as the second generation stamps look further away. To make the first generation stamps really pop I outlined them with a copic multiliner. Plus, you know, I love a black outline :) I drew in some branches and the tree trunk with the same multiliner and then colored them in with my copics.

I stamped my little kitty so he would be batting at one of the falling leaves. Gah, it's so cute! Since Dawn drew them to be hanging out of the hot air balloon I didn't even have to mask! I colored him in and drew in the grass with my copics. For the sky I used Lake House Dye Ink and a blender tool. It was the perfect color for my clear fall day. I used a stippling brush and some white acrylic paint to add in some soft clouds.

For my next card I used Wishing You stamps and companion die, the Going Places companion die, the Starry Background die, along with Falling for Blue Dye ink - all releasing this Friday. In addition, I used White Pigment Ink, Bloomsberry Dye Ink. Nautical Navy Dye Ink, Shimmer Spray, and the clouds from the Sunshine Layers Die.

While I love a one layer card, I realize some of you are fans of much more texture and dimension. These stamps and dies got that covered too, no worries ;) I started off by applying the inks with a blending tool. I usually start with my light ink, then medium, and finally dark. Then I work backwards from medium to the light for a good blend. Once that was done I splashed on some dots of Shimmer Spray. Any excuse to use this stuff I tell ya ;) Once the droplets were dry I squeezed a good amount of Stardust Stickles onto my panel and spread them around with a paint brush. Then waited for those to dry. There's a lot of dry time going on here :)

After the glitter was dry I added a bit more ink on top. I stamped the tiny shooting star in White Pigment Ink. then finished it off with those stippled clouds and some spattered white acrylic paint. What next? You guessed it, let it dry. It's the last time. I promise! I used the Starry Night background horizontally (psst it fits across the entire card width) and cut it twice to cover the whole panel. I die cut the moon out too and added a bit of Hayride Dye Ink behind it.

<

I mounted the colored panel to a white card base. I die cut several of the flat bottom clouds from the Sunshine Layers Die and several from the Going Places Companion Die set. I began laying them down at the bottom of my card to create a place for my sweet Mommy and baby bunny to stand. I stamped the bunnies on white card stock, colored them with Copic markers and fussy cut them out. The top layers of clouds and the top of the bunnies were adhered with dimensional adhesive.

I love the way both cards turned out. And since I was having such a good time I decided to make a third card.

If you're interested in seeing another one layer scene you can head over to my blog, You and Your Big Dreams to check it out.

Here's a quick recap of the supplies I used from the August 2015 Release, available starting this Friday, August 14, 2015.

Starry Background
Steel Rule Die
$15 USD

Wishing You
4x6" Clear Stamp Set
$14 USD

Wishing You Companion Die
Steel Rule Die
$15 USD

Wishing You Sentiments
3x4" Clear Stamp Set
$6 USD

Going Places
4x6" Clear Stamp Set
$14 USD

Going Places Companion Die
Steel Rule Die
$18 USD

Autumn Leaves
4x6" Clear Stamp Set
$14 USD

Autumn Splendor Collection
PURE COLOR Dye Inks

Design Team Inspiration

The rest of the Design Team has more inspiration to share as well:

Giveaway Alert

We've got another store credit up for grabs! Would you like to win a $25 store credit to wplus9.com? Just leave a comment below by 10:00 a.m. EST on 08/13/15 to be entered and I will select one random winner from all comments. Winner will be posted on our Release Winners page by noon on 08/13/15.

We hope you'll join us again tomorrow for more from this release!

Connect with us:

Follow Us on Pinterest