Showing posts with label Holiday Boughs. Show all posts

Wednesday, December 6, 2017

Colored Pencil and Heat Embossed Holiday Boughs with Yana

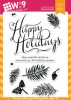
Hello, friends! I hope you are having a great stamping week! Today I’m sharing a pencil colored and heat embossed Holiday card.

I started working on my card by stamping a sentiment from the Be Merry set in Silver Lining ink onto Coal Mine cardstock. I used a stamp positioner and kept my stamp on the door of my stamping platform to be able to stamp it again in the same spot on my panel.

I filmed a video tutorial showing the creative process from start to finish.

Watch my video tutorial:


Watch above or watch in HD at YouTube

Next, I colored banner and the inside of the letters in the word Merry using Polychromos pencils. Later I colored and heat embossed identical banner on white cardstock and foam mounted it onto my card as I wanted the red to be a bit more vibrant on this card.

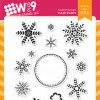
I also stamped pine branches from the Holiday Boughs set in same gray ink framing my sentiment. Using several green Polychromos pencils I colored each branch creating a hand-drawn look.

Once my coloring was done I replaced the panel inside my stamp platform and stamped the sentiment again in clear embossing ink. I also stamped berry and pine branches and heat embossed everything in white embossing powder.

After adhering my panel onto an A2 top folding card base made out of white cardstock I added red berries using Nuvo Drops in Red Berry color and foam mounted an identical but brighter banner on top.

I definitely enjoyed creating the subtle greenery look you see on this card, although same effect can be achieved using pigment ink. I don't always like to use pigment ink as it takes a long time to dry, so I used colored pencils instead. Let me know what you think!

And as always, have fun stamping!

Featured Supplies

For your convenience, here is a list of the featured supplies used on today's project(s), along with links to purchase. Please note: this list contains affiliate links.

Wplus9 Be Merry Clear Stamps Wplus9 Be Merry Clear Stamps Shop at: WP9 WPlus9 Holiday Boughs Stamp Set WPlus9 Holiday Boughs Stamp Set Shop at: WP9 WPlus9 Silver Lining Dye Ink WPlus9 Silver Lining Dye Ink Shop at: WP9 WPlus9 Coal Mine Cardstock WPlus9 Coal Mine Cardstock Shop at: WP9 Faber-Castell Polychromos Colored Pencils 12 Piece Set Faber-Castell Polychromos Colored Pencils 12 Piece Set Shop at: SSS | BL
Faber-Castell Polychromos Colored Pencils 24 Piece Set Faber-Castell Polychromos Colored Pencils 24 Piece Set Shop at: BL Faber-Castell Polychromos Colored Pencils 36 Piece Set Faber-Castell Polychromos Colored Pencils 36 Piece Set Shop at: BL Simon Says Stamp Small Teflon Bone Folder Tool Simon Says Stamp Small Teflon Bone Folder Tool Shop at: SSS Hero Arts Heat Embossing Gun PW200 Hero Arts Heat Embossing Gun PW200 Shop at: SSS | SC | HA | AZ Hero Arts White Embossing Powder PW110 Hero Arts White Embossing Powder PW110 Shop at: SSS | SC | HA | AZ
ScraPerfect Crafting Pouch ScraPerfect Crafting Pouch Shop at: SSS | AZ Tim Holtz Tonic Craft Stamp Platform Tim Holtz Tonic Craft Stamp Platform Shop at: SSS | SC | AZ Scor-Tape 1/8 Inch Crafting Tape Scor-Tape 1/8 Inch Crafting Tape Shop at: SSS | AZ Tonic Red Berry Gloss Nuvo Crystal Drops Tonic Red Berry Gloss Nuvo Crystal Drops Shop at: SSS Scrapbook Adhesives White Foam Squares Scrapbook Adhesives White Foam Squares Shop at: SSS | SC | AZ
Tonic Studios 8.5 Inch Paper Trimmer Tonic Studios 8.5 Inch Paper Trimmer Shop at: SSS | SC

Monday, December 4, 2017

Vintage Happy Holidays with Joni

Hello Everyone! Joni here sharing some of my favorite holiday stamps from Wplus9. Merriest Wishes, Merry Little Christmas, Holiday Boughs, and Holiday Trimmings.

First, I stamped the elf from Merriest Wishes and colored him with Copic Markers. Next I distressed the background using a sponge dauber using Fairy Dust Dye Ink and distressed the same spot with the Sea Breeze Dye Ink. This give more of a vintage look I am going for.

Then, I splattered the background with Winsor and Vewton gouache in white, to give that snowy background to the card. Next, I finish off the card by stamping the sentiment "Happy Holidays" from Holiday Boughs. I inked the stamp using Versamark ink and heat embossed it using gold embossing powder.

I used the same background technique for the next card. But this time I used the retired Merry Little Christmas stamp set and colored the image with Copic Markers. Although this set is retired, it is always nice to have some fresh inspiration for those that may already own it, right? And ways to use your older stash with newer items is always a plus!

After distressing the card and splattering it, I then stamped the Holiday Boughs on the top of the card. I also added some red Stickles on the ornament and on his hat. I finished off the card with sentiments from Holiday Trimmings and Holiday Boughs.

I hope you've enjoyed this fresh look at these oldie but goodies.

Friday, October 28, 2016

VIDEO: Dry Embossed Details with Yana

Hello everyone! This is Yana Smakula and today I’m going to show you a quick way to add simple details to one layer projects.

In the past, I’ve talked about using a negative die cut panel to create a DIY embossing plate, today I’m going to show you how you can use your companion dies and add dry embossed details to stamped images.

I created 2 projects using different colors of ink, cardstock and sentiments. While my cards are Holiday themed, this technique works great for many other occasions. The only requirement - your stamps need to have coordinating dies.

Watch above or watch in HD at YouTube

You want to start by doing stamping first. I began by placing companion dies for the Holiday Boughs images I wanted to have embossed onto my panel. I taped them using low tack tape and made sure dies did not overlap; it's okay for them to touch on the edges, but not okay to overlap even a bit.

I placed coordinating stamps over the dies, moved the panel inside my MISTI stamp positioner and picked the stamps up using MISTI door. You don’t need to have a MISTI for this technique, you can also do this using a regular clear block.

Once stamps were mounted, I removed the dies and stamped my boughs using Last Leaf ink. I also added additional images to fill in the background. I stamped several branches using Mojito, added pine cones using Coconut Husk and berries using Gala Red dye inks.

After my stamping was done I replaced dies over the stamped images I wanted to have dry embossed, taped them in place and embossed in my die cutting machine using embossing sandwich.

Note: Check your die cutting machine manual to learn how to make embossing sandwich (to emboss with dies) for your die cutting machine. These sandwiches are different for different machines. You will need to use Spellbinders Embossing Mat to be able to emboss with dies.

When doing embossing you’ll need to do it all at once, otherwise you’ll flatten the previously embossed pieces. I embossed all the images in the bottom left corner first and in the top right corner later. I only partially covered my panel when I did the second embossing run not to flatten the previously embossed pieces.

Because the sentiments on my cards were heat embossed in white embossing powder, I needed to blend some ink over them to help them pop; I also wanted to add ink to my background to help dry embossing stand out.

I used Warm Wool ink to blend over the Oatmeal cardstock panel and a mix of Last Leaf and Mojito to blend over white.

Be sure to watch my video tutorial for more tips, see additional examples and learn from my mistakes.

Have fun stamping!

Thursday, July 14, 2016

Christmas in July with Maureen

Hi all, It's Maureen. It's never too early to get started on your holiday cards and I'm a big fan of Christmas in July!

This sentiment from Holiday Boughs is just stunning and it's perfect for CAS cards! Simply stamp and emboss, then frame the sentiment with the images in the set or the snowflakes from Folk Art Flurries like I've done here. You can't go wrong with gold & silver, it's timeless and elegant, a favorite of mine for the holidays!

If you like to mass produce, this could easily be replicated again and again with ease.  It's even flat for mailing!

What do you think? Christmas in July, yay or nay?


Featured Supplies

For your convenience, here is a list of the supplies (or equivalents) used on today's project(s), along with links to purchase. Please note: this list does contain some affiliate links.


Connect with us:

Follow Us on Pinterest