Showing posts with label Hand Lettered Hello. Show all posts

Friday, February 1, 2019

Beautiful Birthday Girl w/Kara ft. HELLO & THANKS

Hello! I'm back again with a clean and simple card design that reminds me of a Victorian style photo frame. A lot of the detail is created with texture from some of my favorite dies. Brightly colored florals accentuate the focal point and make it pop. With the help of the many customizable sentiment stamp sets, this is a design that can be used for any occasion.

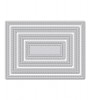
To begin creating the 'frame' I die cut a piece of white cardstock using the Sunshine Layers Die, a real classic. I placed the large oval die, from the Basic Labels Die, in the center and ran it through my die cut machine again. Using a scrap of black cardstock, I die cut the oval once more in order to place behind the opening and add a shadow to the left side.

Again in black, I die cut the word 'beautiful' from the Beautiful Butterflies Die. I positioned the letters inside the oval window and adhered them to the card base beneath with some liquid adhesive.

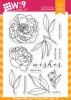
To add that pop of color I used floral clusters from Hello & Thanks colored with Copic markers. I added a hint of shimmer to the flowers with a clear Wink Of Stella pen before adhering them around the oval opening with dimensional adhesive.

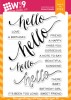
Finally, I added the secondary sentiment to the inside using the Hand Lettered Hello stamp set. This is when you can really customize the card to your recipient and the occasion. I love being able to create a card in advance and then decide later how I'll use it.

Thanks so much for stopping by today!

Featured Supplies

For your convenience, here is a list of the featured Wplus9 supplies used on today's project(s), along with links to purchase.

Wplus9 White Cardstock
Shop at:
WP9
Wplus9 Black Cardstock
Shop at:
WP9
Wplus9 Basic Labels Die
Shop at:
WP9
Wplus9 Sunshine Layers Die
Shop at:
WP9
Beautiful Butterflies Die
Shop at:
WP9
Hello & Thanks
Hello & Thanks
Shop at:
WP9
Hello & Thanks Die
Hello & Thanks Die
Shop at:
WP9
Hand Lettered Hello
Hand Lettered Hello
Shop at:
WP9

Monday, August 28, 2017

VIDEO: Sweet Friend Pineapple Card with Yana

Hello friends! This is Yana and I hope you are having a fabulous week!

The Summer Citrus stamp set has me incredibly inspired these days - I cannot seem to stop using it (I’ve already shared several card designs and have just as many ideas left).

Watch my video tutorial:


Watch above or watch in HD at YouTube

I started working on this card by stamping 4 pineapples using the "rock & roll" technique onto white paper. I used Hayride as my light color and Wild Mango as my dark color. I double and even triple stamped some of these to have deeper shadows.

Next, I cut the pineapple images out using companion dies and stamped the crown using Last Leaf and Appletini. Because this image consists of 2 parts when using a companion die it’s best to stamp one part, cut out and then stamp the 2nd part (or you can cut the shape out first and do stamping later).

I also stamped and cut out 2 little flowers using Little Piggy and Sweet Gelato colors. I love that this set has this flower included with the fruits, it adds quite a nice touch to the stamped projects.

After I foam mounted 2 bottom pineapples onto a white cardstock panel cut to 4 x 5 ¼” I stamped "Hello" from the Hand Lettered Hello stamp set in black ink. To stamp the same word onto the other two fruits I aligned them on my panel, inked up the “Hello” stamp and carefully stamped onto the fruit. Using a stamp positioner tool like MISTI or similar can really simplify this process, but I didn’t care to use it at that moment and stamped it the good old way by eyeballing the placement.

I foam mounted my 3rd pineapple in place and before I added the 4th one I cut it in half and only added the top part onto my card.

Why did I do that? When I was making my original card (I’m making a duplicate on video) I messed up the bottom part of that 4th pineapple and left a visible ink stain. I didn’t want to re-stamp another pineapple, so I resolved to cut the stained part off. I’m happy I did, because this added a unique twist to this otherwise simple project.

To finish this card I adhered my panel onto an A2 top folding card base made out of Oatmeal cardstock (I love using this cardstock for card bases lately); stamped a number of “ink splatters” onto the card using a dot cluster stamp from the Summer Citrus set and foam mounted a “Sweet Friend” white heat embossed sentiment on top.

Have fun stamping!

Featured Supplies

For your convenience, here is a list of the featured supplies used on today's project(s), along with links to purchase. Please note: this list contains affiliate links.

WPlus9 Summer Citrus Stamp Set
Shop at: WP9
WPlus9 Summer Citrus Dies
Shop at: WP9
Wplus9 Hand Lettered Hello Stamps
Shop at: WP9
WPlus9 Little Piggy Dye Ink
Shop at: WP9
WPlus9 Sweet Gelato Dye Ink
Shop at: WP9
WPlus9 Hayride Dye Ink
Shop at: WP9
WPlus9 Wild Mango Dye Ink
Shop at: WP9
WPlus9 Last Leaf Dye Ink
Shop at: WP9
WPlus9 Appletini Dye Ink
Shop at: WP9
WPlus9 Oatmeal Cardstock
Shop at: WP9
Neenah 80LB Solar White Cardstock
Shop at: SSS | AZ
Simon Says Stamp Black Cardstock
Shop at: SSS
Simon Says Stamp Embossing Ink Pad
Shop at: SSS
Tsukineko VersaFine Onyx Black Ink
Shop at: SSS | AZ
Hero Arts White Embossing Powder PW110
Shop at: SSS | SC | HA | AZ
Hero Arts Heat Embossing Gun PW200
Shop at: SSS | SC | HA | AZ
Spellbinders Platinum Die Cutting Machine
Shop at: SSS | SC | SPEL | AZ
ScraPerfect Crafting Pouch
Shop at: SSS | AZ
EZ Runner Grand - Permanent
Shop at: SC | AZ
Scrapbook Adhesives White Foam Squares
Shop at: SSS | SC | AZ

Monday, June 26, 2017

GUEST ARTIST FEATURE: Wanda Guess

Hi there! It’s Wanda Guess, and I am super happy to be here as a guest designer today! I have been a WPlus9 fan for such a long time! Their stamps bring me lots of joy in my craft studio and hours of creative fun. I am also a huge fan of Dawn and her entire creative team. I am always delighted when I get to stamp with them. For my card today I chose to work with the gorgeous Modern Peonies stamp set and the Hand Lettered Hello stamp set. I think they work so nicely together!

I started my card with a crisp white A2 card base folded at the top. I die cut a smaller white rectangle for the focal point and layered pretty lime green cardstock around it. This gave me my foundation of the card. All of the coloring for today was done with Zig Clean Color Brush Markers in pretty shades of pink and green for summer.

I stamped and die cut three big peonies, three small peonies and a bunch of leaves. The matching dies for this set cut like a dream. When I’m making an arrangement like this I always stamp and cut out lots of images to play with - so I can get it just the way I want it to look. I ended up coloring just some of the images, and left the rest black and white and graphic. I love this look!

I stamped the small ‘beautiful’ sentiment in the lower right corner of the white layer, and then glued on the ‘hello’ die with a glue pen, using my tweezers. I did this first so I would know where to place the flowers. SO crisp with that pop of black in the gorgeous font!

I used foam tape to place the top layers of flowers and leaves. The bottom flowers and leaves were attached with tape runner adhesive. I like the difference in dimension with the layers. I did a very loose watercolor wash with the Zig Markers, a tiny paintbrush and water. I used two shades of green and two shades of pink on the images. You could use any colors, though! I think this would be very pretty in red too!

I hope you all have a wonderful, beautiful and creative day! Thanks to the lovely ladies at WPlus9 for having me! It’s been my pleasure to share with you!

~ Wanda

Featured Supplies

For your convenience, here is a list of the featured Wplus9 supplies used on today's project(s), along with links to purchase.

Connect with us:

Follow Us on Pinterest