Showing posts with label Small Butterfly Frame Die. Show all posts

Saturday, May 13, 2017

Die Cut Masking And Spray Mists With Kara

Good Morning, Guys!  It's Kara and I'm back with more May release inspiration.  I'm using the Large Butterfly Frame Die again.  This time I've used it to create a mask!
 
 
I started by die cutting the Large Butterfly Frame out of masking paper.  I peeled off the backing and popped out all the wing pieces.  I placed the die cut onto white cardstock and burnished it with a bone folder to make sure all edges were firmly adhered.
 
 
Once the mask was firmly in place I sprayed the cardstock with Lake House, Silver Lining, and Shimmer PURE Color Spray Mist.  I left the piece to dry before removing the mask.  Once it was dry I removed the mask and then die cut the piece with the large stitched rectangle from the Gift Card Layers Die.  With some black dye ink I stamped this large sentiment from the Lucky Stars stamp set.  I die cut some black cardstock with the butterfly from the Small Butterfly Frame Die and coated it with clear Wink Of Stella.
 
 
I die cut a panel of black cardstock using the same large rectangle die to layer behind the main panel.  I love the way it turned out and all of that shimmer!
 
 
A super easy and fun technique that is perfect for this new die! I hope you enjoyed it. Thanks for stopping by today.  See you next time!
 

Featured Supplies

For your convenience, here is a list of the featured supplies used on today's project(s), along with links to purchase. Please note: this list may contain some affiliate links.

Thursday, May 4, 2017

May 2017 Release Week: Large Butterfly Frame Die with Kara

Tomorrow is the day! All of the new products that we have been sharing with you over the last couple of days will be available for purchase at wplus9.com as well as at many of your favorite retailers. If you are just joining us, be sure to start at Day 1 to catch up.

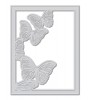
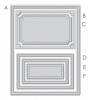
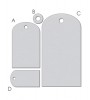
Today, I get to introduce the new Wplus9 Exclusive Large Butterfly Frame Die. This die will be available exclusively at wplus9.com.

AVAILABLE May 5, 2017

Large Butterfly Frame Die
Steel Rule Die
$19 USD

There are so many great stamps and dies being released. I love them all, but my favorites are always the floral sets. They are beautifully designed and timeless. And the new Large Butterfly Frame Die compliments these gorgeous florals perfectly!

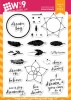
I couldn't resist sharing both Modern Peonies and Modern Anemones as well today. Both are colored with Copics in these vibrant greens and oranges (R08, YR07, YR04, YG17, YG67). I chose to go with simple, yet bold coloring and think the strong illustrations are perfect for this clean look.

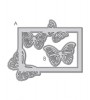
My first project features the Modern Peonies positioned on the new Large Butterfly Frame Die. This die is beautiful! It's large enough to cover the entire front of an A2 sized card and has so many possibilities. You could even die cut it and use it as a stencil.

I adhered it to my card base with dimensional adhesive. To top it off, I added the single butterfly from the Small Butterfly Frame Die. The butterflies are identical on both dies, just in varied sizes. When Dawn first released the Small Butterfly Frame Die, the name made me hope that one day she would release a large version. It's finally here and worth the wait!

For my second card, I used the Modern Anemones set. This time I used the previously released Lattice Frame Die as the backdrop for my flowers. It adds beautiful texture and the perfect spot for a sentiment. The sentiments stamped on these cards are from the opposite sets. The 'Sending Birthday Wishes' is from the Modern Peonies set and the "It takes a long time to grow and old friend' sentiment is from the Modern Anemones set. I did that just in the interest of space and placement in the design.

Because all of the "Modern" florals series share the same font and sizing, and all of the flowers are scaled appropriately, everything can be combined, swapped and interchanged with each other to further expand the possibilities.

Thanks so much for stopping by! I hope you are enjoying all of the new product previews. Dawn will be here tomorrow, so be sure to stop in again!

Giveaway Alert

Would you like to win a $50 store credit to wplus9.com? Just leave a comment below by 10:00 p.m. EST on 05/04/17 to enter and we will select one random winner from all comments. Winner will be posted on our Winners page by 11:00 p.m. on 05/04/17.

Thursday, March 10, 2016

Faux Shaker Card with Maureen Merritt

Hi, it's Maureen here. Today I'm sharing a Faux Shaker card that features the Small Butterfly Frame die and the newly released That is All stamp set.

 Wplus9 Supplies:
Stamps: That is All // Inks: Black // Dies: Small Butterfly Frame Die // Cardstock: White

Why the "faux" shaker? Shaker cards aren't particularly hard to put together, but I find them a bit time consuming. I also like to have control over where all of those little sequins wind up. So, I mostly make Faux Shakers. Faux Shakers have all of the fun of a traditional shaker just without all of the steps.

To make my card, I started by coloring a piece of watercolor card stock using Distress Markers. I spritzed the card stock with water and set it with a heat tool. Next, I die cut the Small Butterfly Frame from the watercolored panel.

Here's where the faux part comes into play. Instead of adding clear acetate to the back of my frame and sprinkling in my shaker bits, I skipped that part. I lined it with foam tape as usual, and then adhered it to the center of a white card base. I stamped the sentiment from That is All in Black ink and then glued all of the sequins into place. I laid a heavier layer of sequins in the bottom of the frame, then sprinkled a few here and there to add flow to the design. Each butterfly was also adorned with a sequin.

The end result gives the appearance of a shaker, but without the fuss of creating an perfect seal so that all of the little bits don't fall out. You could even add in the acetate window to further capture the look.

As always, thanks for stopping by!

Monday, June 22, 2015

PURE COLOR WITH KARA: Summer Anemones

Hey guys, It's Kara. I'm back with another PURE COLOR Combination. Summer is almost here and it's making me so happy! Today's card has a very summery color palette, bright sun and deep green grass.

This warm color palette features Wild Mango, Falling Star, Flamingo, Mojito, and Appletini PURE COLOR dye inks.

I started by stamping my design using Watercolored Anemones in Fairy Dust ink. This pale grey serves as a guide for stamping the flowers and leaves in my color palette. It is soft enough to fade into the background while also providing a slight shadow for my images. I stamped the flowers in Falling Star, Wild Mango, and Flamingo ink. The leaves and stems are stamped in Mojito and Appletini ink. I used the new Black ink to stamp my sentiment from Doodle Buds.

Wplus9 Supplies:
Stamps: Watercolored Anemones, Doodle Buds  // Inks: Wild Mango Dye InkFalling Star Dye Ink, Flamingo Dye Ink, Mojito Dye Ink, Appletini Dye Ink, Fairy Dust Dye Ink, Black Dye Ink  // Dies: Sunshine Layers, Love Mom Layers, Small Butterfly Frame// Cardstock: White, Coal Mine

I die cut the butterfly from white cardstock. Using sponge daubers, I added color starting on one side with a little Appletini ink. As I moved across the butterfly to the left wing, I switched to Mojito ink and then let it fade to almost white. I mounted the stamped panel on a piece of Coal Mine cardstock to add some contrast and pick up the color from the sentiment. Coal Mine is perfect for this card because it is not as stark a contrast as black.


Play Along

What do you think, want to give it a go? We'd love to see your take on this color combination! If you'd like to play along link up your collections below to keep the inspiration going.

Thanks so much for stopping by!

Tuesday, September 16, 2014

Small Butterfly Frame, Updates & GIVEAWAY

Hello! Hope everyone's week is off to a great start!

I have two very different cards to share with you today featuring the Small Butterfly Frame die and the Little Bits stamp set, as well as some of my favorite older supplies. You can find a full supply list at the bottom of this post.

This first card is actually made up of several of the "left overs" I had laying on the desk after an all day craft session...and it happens to be one of my all-time favorites! I just love it when that happens.

I started with the focal point of the card. I die cut 2 tags using the Timeless Tags 2 die from Steel Mill card stock and the In Bloom paper pad from My Mind's Eye. I've been hoarding this stuff. LOVE.

I layered 3 butterflies cut from the Small Butterfly Frame die on top of each other and left the "negative spaces" intact for the bottom layer. For the sentiment I die cut a banner from another one of my favorites - the Basic Banners die, colored it using Sweet Nectar dye ink and a dauber. Then I heat embossed "believe" in white using the Dream Believer stamp set.

Each was adhered to the little due of tags with foam tape.

I wanted the background to be interesting, but still allow that focal point to shine. So I added some splats to a Dove Grey card stock panel using watered down Distress Paint in Picket Fence and a paint brush. After it dried, I decided to "sprinkle" some hearts in there using the Little Bits stamp set. I stamped them first in White pigment ink, and then over-stamped them with Sweet Nectar dye ink.

I don't know about you, but I am always searching through multiple sets to find that perfect little accent image. And then it hit me...I need one set with several small accent images all in one! This sucker has taken up permanent residence on my desk. :o)

This next card is so outside of my comfort zone, it kind of scares me. I went bright y'all. Real bright. And playful. And a shaker!

But seriously, how could I not? This frame screams "Shake me!", doesn't it?

I die cut the Small Butterfly Frame from Sweet Gelato and created a little shaker focal point filled with Pretty Pink Posh sequins.

I stamped "birthday girl" on the inside of the shaker and adhered a die cut "hello" to the outside using the Hand Lettered Hello die.

For the background, I mimicked the shaker by creating a fun patterned paper using several of the images from Little Bits in multiple colors.

Still not sure if I am loving this card...but it was fun to create and I'm sure there is a little girl out there who will love to receive it!

Updates

Restocks - We have several shipments of restocks on their way. So be on the look out for emails if you've signed up to be notified. Or, if you follow us on Facebook, be on the look out for announcements there.

Website Forms - We have had some issues with our email and the forms on the website. Just enough forms were getting through not to alert us to a problem. However, the mass majority were not. We think we have recovered most of the them and are working through them. However, if you have tried to contact us and have not heard back, and just want to be sure, you can email us again directly at customer service@wplus9.com

I sincerely apologize to those that this may have affected.

October Release - As many of you know, October is our Holiday release and we are very excited to share our newest products with you! We will start sharing peeks of our work soon on Instagram (dawnwplus9) and Facebook soon. And all of the products will be introduced and revealed starting October 1st!

Giveaway

***Giveaway is now closed***

I've got a Small Butterfly Frame, a Little Bits stamp set and a 15USD store credit that I'd love to give away!

So, are you ready to start your Holiday crafting yet? Or are you holding out as long as possible? Just leave a comment below by 10:00 p.m. EST on 09/21/14 to enter. I will select one random winner from all comments. Winner will be announced on Monday, 9/22/14.

***Giveaway is now closed***

Good Luck!

Supplies

Connect with us:

Follow Us on Pinterest