
Welcome to Day 1 of the Wplus9 October/November Release. For those of you that are new to Wplus9, we will spend the next couple of days getting up close and personal with the products that we will be releasing this month. All previewed items will be available for purchase on October 5th at www.wplus9.com.
It's time for our Holiday release! We have a lot of stuff to introduce this week and I am so excited to share it all with you. Let me start by saying that I had a blast creating for this release! I literally had so many ideas that I didn't know where to start. And then once I did, I had to make myself stop and move on to another set. And this happened for every single set.
I am also pleased to announce that we have a very special Guest Designer joining us this month, an extremely talented crafter who's work I've admired for a long time, Anya Schrier! I am so happy that she agreed to help us out with this release and can not wait to see what she turns out! So, let's get on with the formal introductions, shall we? I hope that you love them as much as I do!
Folk Art Flurries
- is a 4x6 clear photopolymer stamp set
- 14 high quality photo-polymer stamps; 13 snowflakes and snowflake builders, and 1 circle tag border image
- will be available for purchase October 5th for $14
Pretty Patches: Christmas
- is a 3x4 clear photopolymer stamp set
- 8 high quality photo-polymer stamps; 3 sentiment images, 1 heart and 4 sentiment builders
- will be available for purchase October 5th for $6
Seasonal Sentiments
- 5 separate dies wired together that can be easily separated
- will be available for purchase October 5th for $14
Clear Cut Stackers: Stars
- cuts 4 graduated stars in the following sizes: 4", 3", 2", and 1"
- 4 separate dies
- will be available for purchase October 5th for $16
First up, let's take a look at Pretty Patches: Christmas. This is another set in our Pretty Patches series. And like all of the previous sets in this series, it's a small set packed with possibilities.

This is a sentiment set with a twist. There are three large sentiment images and 4 sentiment builders to mix and match or use all together. Here, I started with the "May the WARMTH of Christmas bring" sentiment, added the "HOPE" image on a Label Layers 1 Die, and finished with the "for a HAPPY holiday" sentiment.

To the center of hope, I added a heart that I die cut from Cupid's Bow card stock using the Seasonal Sentiments Die. Yes, yes I did say Cupid's Bow card stock! I'll tell you more about the new colors of card stock we are adding later this week.
To embellish, I've used the snowflake from the Seasonal Sentiments Die and the 1" star from the Clear Cut Stackers: Stars die to create a little strand of garland. All of the patterned paper comes from the lovely Simple Stories Handmade Holiday collection. LOVE this stuff!

Next, I paired the Seasonal Sentiments Die with Pretty Patches: Chistmas. Each of the die cut words can be use alone, but they can also be paired with the sentiment builders from Pretty Patches: Christmas for even more possibilities. I purposely designed these items to work independently or together seamlessly.

I started by die cutting "hope", "love", and "joy" from the Simple Stories Handmade Holiday patterned papers. I left the letter "o" solid in all three words intentionally. You can stamp onto the "o" or use the heart die included in the set to cut out or add to the center, or use the snowflake image included to add to the center.

I decided to add to, cutting both from our Oatmeal card stock. Each of the works are generously sized, but not too big to be used together. I lined them up on an Oatmeal panel and stamped "May the SPIRIT of Christmas bring" from Pretty Patches: Christmas at the top, and "Season's Greeting" from Pretty Patches: Tree at the bottom. More on that a little later this week.

To balance it out, I used the 1" shapes from the Clear Cut Stackers: Pinking Squares and the Clear Cut Stackers: Stars dies and stamped them using Country Charm.

I matted the panel with a Kraft card base, to finish. What I really love about this card is how quick it is to mass produce and it's flat! Easy to mail and easy on postage.

For my next sample, I wanted to create a little ensemble perfect for gift giving.

We are adding these cute assembled Kraft pillow boxes to the store. I'll have all of the details on these later this week. Pillow boxes are a classic, quick and easy way to package gifts. And these are the perfect size for gift cards! Now I love me some Kraft, but I just had to decorate it.

To create the wrap, I die cut a 3" pinking square and then used the 2" star from Clear Cut Stackers: Stars to cut a star out of that. I then cut another 2" star from Cupid's Bow card stock to nestle inside of the pinking square.

I adhered them to a square of Oatmeal card stock and machine stitched it into place. To secure this to the pillow box, I stitched some red ribbon to the top and bottom and tied it around the box.

To create the ornament, I used the 4" star from the Clear Cut Stackers: Stars die. I needed something sturdy, so I cut one from Wafer Board and one from card stock and adhered the card stock star on top. Wafer Board is a wonderful alterable medium with a natural finish that we will be carrying. It's thicker than card stock, but not as thick as chip board, so it works beautifully with our dies! I will have all of the details on this later this week as well.

I cut a 3" star from patterned paper and adhere that on top. For the center, I embossed the "JOY" sentiment from Pretty Patches: Christmas onto a 1.75" circle from the Circle Stackers 1 die.

And of course, you can't forget the card.

Now let's take a look at Folk Art Flurries. This set if filled with snowflake images in a variety of sizes, with a little bit of a folksy twist. However, don't let the name fool you, with the proper color palette and treatment, they can can be quite elegant as well.


To finish the sentiment, I added "LOVE" and stamped the "o" with another snowflake from Folk Art Flurries. A Kraft panel is the perfect back drop for this rustic yet elegant card.

I have one last card to share today. I've used Folk Art Flurries to create a clean and simple card that is a great candidate for mass production.

The largest snowflake in this set is a muli-step stamp for those of you who like to add color. It's perfect for taking a simple design and kicking it up a notch. I stamped the outer three rings in a different color.

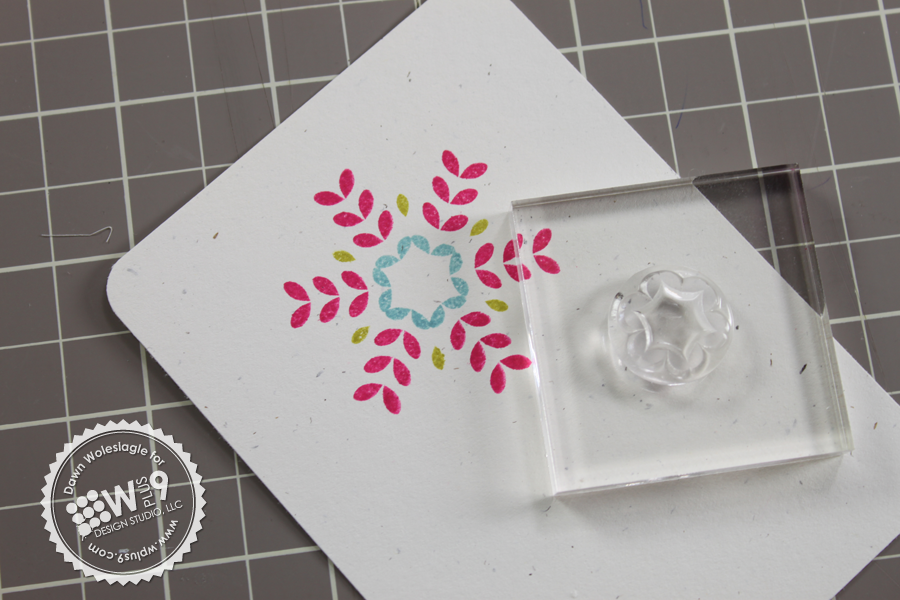
And then added one of the smallest snowflakes to the center in pink. A rhinestone adds just a bit of bling without adding any extra bulk.

Whew! That is all I have for you today. But, the design team is ready to show you more! Be sure to click through and please, don't forget to leave them some love.
- Elise Durenberger
- Cristina Kowalczyk
- Jinny Newlin
- Kerrianne Gwin
- Lea Lawson
- Savitri Wilder
- Jean Martin
- And our Guest Designer Anya Schrier
I really hope you enjoyed today's previews. Did you see something you liked? Would you like to win today's featured products: Pretty Patches: Christmas, Seasonal Sentiments Die, Folk Art Flurries and the Clear Cut Stackers: Stars die? Just leave me a comment by 9:00 AM EST October 2nd telling me what your favorite Christmas color combination is to enter. I will select one random winner from all comments. Winners will be posted here.


