Hello! I'm back with more inspiration featuring our December 2014 Release! If you are just joining us, don't forget to check out yesterday's post to see all of the new products we will be releasing on December 5, 2014.
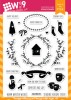
Today I am sharing a bit of the new Sparkle & Shine products. There is a stamp set with companion die, as well as a set of word dies that compliment the stamp set beautifully. And let me apologize in advance for the gross over-use of watercolor techniques! LOL
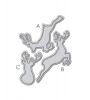
First up, I've paired the Sparkle & Shine stamp set and the Sparkle & Shine Trio Die together for a fun and graphic card.

I started by heat embossing the gems in a random pattern onto watercolor paper in white. I then used the same technique as I did on yesterday's card and watercolored each of the gems with Tim Holtz Ranger Distress Inks. I could watercolor gems all day long! In fact, I think I did. LOL
I knew I was going to be adding the "shine" word die to my sentiment, so I added a partial sentiment from the Sparkle & Shine stamp set. I covered the word "shine" on the stamp with tape and then inked it up as usual. I removed the tape and then stamped it onto the watercolor paper.
For the top panel, I stamped the Wide Stripes Background cling stamp from Simon Says Stamp onto Dove Grey cardstock in VersaMark ink, sprinkled on some Ranger Sticky embossing powder and heat embossed it. This turned the powder into a sticky adhesive, allowing me to add a little clear glitter. Once that was all done, I die cut the bottom edge into a curve using the Landscape Borders Die.

I adhered the panel to the watercolor background using foam tape towards the bottom and directly with a tape runner to the top. Finally, I die cut the word "shine" from Black cardstock three times and glued all of them together, one on top of the other using Multi Medium Matte adhesive. I love how this design transitions from monochromatic to bright and colorful!
This set is great for creating quick and easy cards with style and an artistic flair as well. In this next card, I've paired it again with watercolor and the previously released Strictly Sentiments 1 stamp set.

Super simple. I stamped the sentiment onto a watercolor cardstock panel and added a little background wash of color just above it. Then I used the same technique as above, watercolored a gem, and this time used the Sparkle & Shine Companion Die to die cut it out. I popped it up on foam tape and then adhered the panel to my card base using foam tape.

A little Wink Of Stella clear glitter pen for a touch of sparkle on the diamond and...Done. I think I'll be making a set of these in several colors.
Now, you don't have to go through the trouble of making the gems look real either. They look just as cool with a loose style as well.

Here, I stamped the gems in black onto White cardstock and used a paint brush and Tim Holtz Distress Inks to very loosely lay down a bit of color over each gem. You can see that I didn't take any care to stay inside of the lines. I like the abstract look this gives the design.

This is another one that I can't wait to try in several different colors.
I've got one more pair of cards to share with you today. This set is full of fun sentiments featuring some wonderful fonts that make great focal points as well.

I started both of these cards the same way by heat embossing the sentiment onto watercolor paper in white.
I then covered the center of the paper with clean water and spread it out around the edges. I didn't cover the entire panel though, I wanted to reserve the white edge and end up with a "puddle" of color. I then used a large round brush to pick up some Tim Holtz Distress Ink and added it to the water by just touching the brush to the wet areas of the paper.

On the above card, I continued to add color at different stages as the water started to dry. You can see the different layers of watercolor show up in the finished product. I also added a watercolored and die cut gem along with some sequins and Hero Hues Clear Gems.

And in this card, I added all of my color while the paper was it's wettest, and allowed the colors to "bloom" into each other. The end result is a much smoother and softer transition of color. I finished this one off by heat embossing a gem onto vellum and die cutting it, this softens the color underneath and makes the larger gem just a bit more prominent. And for the littler gems, I heat embossed them directly onto the watercolored panel.
I still have several projects to share with you featuring this set, but I'll stop here for today and share the rest a little later this week. But the Design Team has plenty to share with you today as well.
Design Team Inspiration
Giveaway Alert
As always, we've got a giveaway! Would you like to win the Sparkle & Shine Stamp Set, the Sparkle & Shine Companion Die and the Sparkle & Shine Companion Die before you can buy them? Just leave a comment below by 10:00 a.m. EST on 12/03/14 to enter. I will select one random winner from all comments. Winner will be posted on our Releaser Winners page by noon.
As always, thanks for stopping by and Good Luck! Don't forget to come by again tomorrow for more release inspiration and giveaways!