Welcome back! It's day 2 of our February 2015 Release and I have more to share with you today! If you are just joining us, be sure to check out Day 1 here. The entire February 2015 Release will be available for purchase beginning February 5th at wplus9.com and at many of your favorite retailers as well.
I know that all of you are very excited to get a closer look at today's featured products...so I won't torture you any longer. Let's dive in!
Featured Products - Available February 05, 2015

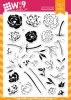
Unforgettable
4x6" Clear Stamp Set
$14 USD

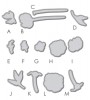
Unforgettable Companion Die
$14 USD

Bubble Talk
4x6" Clear Stamp Set
$14 USD

Bubble Talk Companion Die
$8 USD
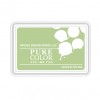
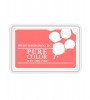
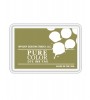
PURE COLOR Storybook Collection

Yep, I just loved this little guy so much that I had to create two sets! Unforgettable features three little elephants that can all interact with the balloon included in the set in some way. It is filled with little accent images to dress up the ellies and some big bold sentiments that perfectly match the playfulness of this set.
This first card uses only the Unforgettable stamp set and was a concept that I had while illustrating the set. I knew right away what this finished design was going to look like and it came out exactly as I'd imagined. That doesn't always happen! LOL

I started by stamping my elephant and ballon onto my card panel using Memento dye ink in Tuxedo Black onto our White Cardstock. I then cut the clouds from the Sunshine Layers Die that I introduced yesterday from Inkadinkado masking paper. I also stamped the elephant and balloon onto the masking paper and hand cut them out. I laid down my masks and then airbrushed my background using the Copic Airbrush System. I added just the slightest hint of Y11 in random spots for sunshine and then filled in with B41 and little B91 for variation.
For the clouds, I added a little shading with C0 and N0, and then heavily "washed" it out using the 0 Blender Copic. Several of you requested a video based on the sneak peeks I posted of this, so stay tuned as I'll have one for you following the release.

I used the W series of Copics to color Ellie - W0, W2 and W5 - with R20 and RV11 for the cheeks and ears. I just love the balloon in Unforgettable! I wanted a big overside, very round balloon for this set. I colored it using R20, R24, R29 and a little R89. I did cover the whole balloon with a little Clear Wink of Stella, but as you all know...it's so hard to capture in pictures.

The sentiment is just perfect for this image, don't you think? I wanted a nice clean edge on the bottom, so I just masked off the "just sayin'" portion before stamping with Memories dye ink in black.
Next up is a card featuring the Bubble Talk stamp set. Bubble Talk features a little elephant blowing bubbles with both solid and open speech bubbles. There are several sentiments included in the set that can all fit into one of the open bubbles to create a variety of greetings.

How cute is that? I colored the elephant using the same W series of Copics. I added the grass and background as well using Copic markers. For the bubbles, I added a little blue, green and purple and heavily blended them using the 0 Copic similarly to the technique I used on the clouds above. I was trying to mimic the way colors swirl through bubbles as the light shines through them.

I then ran the whole panel through my Big Shot using the Holiday Apertures Die to create a little panel with a stitched border. I matted it with some Green Acres card stock adhered it to a white 4 x 5 1/2" card base. I used the Bubble Talk Companion Die to cut out the heart shaped bubble and stamped my greeting inside. I added a little doodling inside using a .3 Copic Multiliner and adered it to my panel using a little foam tape.
I decided to use this same color combo with Unforgettable and the Sunshine Layers Die to create a belated birthday card. This time I swapped out the Copics for our new PURE COLOR dye inks in Bo Beep and Beanstalk to create the background.

This time I used the sitting elephant colored in the C series of Copics, along with the little flower also included in the set. I stamped the elephant first and masked just the little portion of his trunk before stamping the flower. I just love how he is offering up that flower as a "bribe" for forgiveness. LOL

I die cut some Inkadinkado Masking Paper using our Landscape Borders Die. I die cut a white panel using the Sunshine Layers Die and laid down the bottom portion of my mask over the bottom half. I used a Ranger Mini Ink Blending Tool to softy sponge Bo Peep dye ink in for my sky. Then I laid down the top portion of the mask over the sky and did the same thing to create my grassy hill using Beanstalk dye ink. I repeated this onto another panel and die cut a circle from it using our Clear Cut Stackers: Circles Die

I added my "so very sorry I forgot" sentiment and then adhered the panel to a scalloped mat cut using the Sunshine Layers Die using foam tape. For something a little different, I cut my card base 1/4" smaller than my mat and adhered it to the back. This left me with a scalloped edge all the way around my card.
For my last card today, I used Unforgettable and Bubble Talk together along with the Sunshine Layers Die again.

This time, I decided to add a little hand doodling with a Copic Multiliner to my elephant to dress her up. This time, I colored her with the N Copic series, and once she was all done...she looked like she was ready for a party to me!

I decided to create a little shaker card filled with a bunch of Pretty Pink Posh sequins. I was inspired by the Holi Festival for the background of the shaker portion. I used Copics to create a wash of different colors - trying to emulate the colored powder beging thrown through the air. I think it comes pretty close.

That's it for me today. I still have more to share with this set, but I know the Design Team has more to share with you as well. I will be back a little later with the rest. I'm hoping to get a video filmed based on a watercolor sneak peek that several of you requested.
Design Team Inspiration
Giveaway Alert
It's time for another giveaway! Would you like to win the Unforgettable, the Unforgettable Companion Die, Bubble Talk and the Bubble Talk Companion Die before you can buy them? Just leave a comment below by 10:00 a.m. EST on 02/03/15 to enter and I will select one random winner from all comments. Winner will be posted on our Releaser Winners page by noon on 02/03/15.
I'll be back again tomorrow with more of the February 2015 Release along with more chances to win, so be sure to come back. Good luck and thanks for stopping by!