Monday, August 28, 2017

VIDEO: Sweet Friend Pineapple Card with Yana

Hello friends! This is Yana and I hope you are having a fabulous week!

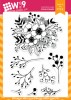
The Summer Citrus stamp set has me incredibly inspired these days - I cannot seem to stop using it (I’ve already shared several card designs and have just as many ideas left).

Watch my video tutorial:


Watch above or watch in HD at YouTube

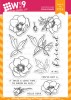
I started working on this card by stamping 4 pineapples using the "rock & roll" technique onto white paper. I used Hayride as my light color and Wild Mango as my dark color. I double and even triple stamped some of these to have deeper shadows.

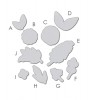
Next, I cut the pineapple images out using companion dies and stamped the crown using Last Leaf and Appletini. Because this image consists of 2 parts when using a companion die it’s best to stamp one part, cut out and then stamp the 2nd part (or you can cut the shape out first and do stamping later).

I also stamped and cut out 2 little flowers using Little Piggy and Sweet Gelato colors. I love that this set has this flower included with the fruits, it adds quite a nice touch to the stamped projects.

After I foam mounted 2 bottom pineapples onto a white cardstock panel cut to 4 x 5 ¼” I stamped "Hello" from the Hand Lettered Hello stamp set in black ink. To stamp the same word onto the other two fruits I aligned them on my panel, inked up the “Hello” stamp and carefully stamped onto the fruit. Using a stamp positioner tool like MISTI or similar can really simplify this process, but I didn’t care to use it at that moment and stamped it the good old way by eyeballing the placement.

I foam mounted my 3rd pineapple in place and before I added the 4th one I cut it in half and only added the top part onto my card.

Why did I do that? When I was making my original card (I’m making a duplicate on video) I messed up the bottom part of that 4th pineapple and left a visible ink stain. I didn’t want to re-stamp another pineapple, so I resolved to cut the stained part off. I’m happy I did, because this added a unique twist to this otherwise simple project.

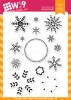
To finish this card I adhered my panel onto an A2 top folding card base made out of Oatmeal cardstock (I love using this cardstock for card bases lately); stamped a number of “ink splatters” onto the card using a dot cluster stamp from the Summer Citrus set and foam mounted a “Sweet Friend” white heat embossed sentiment on top.

Have fun stamping!

Featured Supplies

For your convenience, here is a list of the featured supplies used on today's project(s), along with links to purchase. Please note: this list contains affiliate links.

WPlus9 Summer Citrus Stamp Set
Shop at: WP9
WPlus9 Summer Citrus Dies
Shop at: WP9
Wplus9 Hand Lettered Hello Stamps
Shop at: WP9
WPlus9 Little Piggy Dye Ink
Shop at: WP9
WPlus9 Sweet Gelato Dye Ink
Shop at: WP9
WPlus9 Hayride Dye Ink
Shop at: WP9
WPlus9 Wild Mango Dye Ink
Shop at: WP9
WPlus9 Last Leaf Dye Ink
Shop at: WP9
WPlus9 Appletini Dye Ink
Shop at: WP9
WPlus9 Oatmeal Cardstock
Shop at: WP9
Neenah 80LB Solar White Cardstock
Shop at: SSS | AZ
Simon Says Stamp Black Cardstock
Shop at: SSS
Simon Says Stamp Embossing Ink Pad
Shop at: SSS
Tsukineko VersaFine Onyx Black Ink
Shop at: SSS | AZ
Hero Arts White Embossing Powder PW110
Shop at: SSS | SC | HA | AZ
Hero Arts Heat Embossing Gun PW200
Shop at: SSS | SC | HA | AZ
Spellbinders Platinum Die Cutting Machine
Shop at: SSS | SC | SPEL | AZ
ScraPerfect Crafting Pouch
Shop at: SSS | AZ
EZ Runner Grand - Permanent
Shop at: SC | AZ
Scrapbook Adhesives White Foam Squares
Shop at: SSS | SC | AZ

Friday, August 25, 2017

Watercolored Botanical Bunch With Kara

Hey Guys! It's Kara. I'm here today with a card featuring Botanical Bunch and one of my all-time favorite sentiments from Modern Anemones. Most of my friends are old friends, friends I made in high school, and this sentiment is perfect for them! There really is nothing quite like an old friend!

For this card I started by stamping the large cluster of flowers from Botanical Bunch all over a piece of white cardstock. I used Black PURE Color Dye Ink because it is waterproof. Because it's waterproof, it is perfect for using with watercolor techniques.

I used various Distress Inks to color my flowers. I did so very loosely, not worrying if I went outside the lines. I used several shades of ink on each leaf and flower allowing colors to dry in between. When everything was dry, I splattered on a little black. I then cut the panel down using the 4 Bar Stitched Rectangle Die.

I knew I wanted to soften everything up with a velum overlay, but wanted some of that background to be prominent and in the foreground. I decided to cut out a portion using the large oval from Basic Label Dies and reposition it on top of the vellum. It brings the design forth and also serves as an anchor for my sentiment.

I stamped the sentiment from Modern Anemones in black ink on the vellum and then sprinkled on clear embossing powder. I heat set the powder and added the die cut word 'friend' from Basic Greetings Dies to finish it off.

Thank you so much for coming by today. Have a great weekend!

Featured Supplies

For your convenience, here is a list of the featured Wplus9 supplies used on today's project(s), along with links to purchase.

Monday, August 21, 2017

GUEST ARTIST FEATURE: Kay Miller & A SALE

Hi there! It's Kay Miller and I am so excited to be guesting again with WPlus9! I absolutely love everything they come out with!

For my project today, I decided to use a few older stamp sets that are some of my favorites. And, since we've past the halfway mark and are now counting down the days until Christmas, I wanted to get a head start on my Christmas cards and share a little about how I'm going to be doing mine this year.

I love to layer stuff. That is just my thing! I cut out lots of stuff, then have so much fun messing around with it in different ways until I get something I like. I still plan on doing a lot of cards this way, but I also want to do some flat cards, because last year, I had a really hard time mailing my cards. Some of them would not even fit into the envelope, and of course they all took extra postage.

So today I'm going to share with you a “fluffy” layered card, and then a couple of flat versions. I have found that even with my flat versions, I can still layer the stamping which I love!

So my first card here is they layered one. I used mainly Silver Bells stamp set and coordinating dies, along with Fresh Cut Florals and Folk Art Flurries. I first watercolored a blue background with Peerless Watercolors. When that was dry, I stamped some of the small snowflakes from Folk Art Flurries.

Next I stamped the sentiment in black then stamped and cut out all of my images. I layered them with foam tape and adhered this to my watercolored panel.

Lastly, and this is why most of my cards won't fit into envelopes, I mounted the whole panel onto an A2 top folded card with fun foam. I also added a few drops of Nuvo Crystal Drops.

Okay now for the flat version. And I mean completely one layer flat. I just stamped everything directly onto a top folded A2 size white card. I did use my MISTI stamp positioning tool for this because I wanted to be able to stamp again, if I didn't get a good impression, but it was not necessary. Everything was only stamped once.

Using the MISTI though would be a great way to mass produce this design. I did add a few drops of Nuvo Crystal Drops for that finishing touch.

This is another flat version done exactly like the one above, only I splattered a little bit of gray ink mixed with water after I was done. I thought that added a unique touch.

Even though these are simply done, I do like the design a lot, and I love how the design is stamped over the sentiment. I will definitely be doing some different designs like this for my Christmas cards this year.

Thank you so much for stopping by, and a huge thanks to Dawn and Wplus9 for having me guest!

~Kay

FLASH SALE

Wplus9 is have a 1 Day Only Flash Sale in honor of the eclipse! Enter the code below at check out to receive 30% off of your entire order:

Coupon Code: eclipse2017

***Coupon Code is valid on all orders completed 9:00 a.m. ET August 21, 2017 to 8:59 a.m. ET August 22, 2017, while supplies last. Valid on in stock items only. No rain checks. Discount can not be applied to previous orders. Excludes wholesale orders.***

Featured Supplies

For your convenience, here is a list of the featured Wplus9 supplies used on today's project(s), along with links to purchase.

Sunday, August 20, 2017

Distress Inks vs. Distress Oxide Inks with Kelly

Hello Crafters! Do you ever find yourself in a crafty rut?

Sometimes that means not being able to create anything we like at all but other times it means always creating the same types of cards. Lately me and scene cards go together like peas and carrots. I love scene cards. Don't get me wrong. But sometimes I don't have an hour and a half to devote to creating a single card.

In order to take a break I thought I would just sit down and play with colors. Since I was playing with colors anyway I thought it would be fun to compare Tim Holtz Distress Inks to Distress Oxides. There's been a ton of comparisons done but what I really wanted to see was color to color what was the difference.

I got out a rainbow of colors and some favorite stamps and went to work. You can see the cards from start to finish in the video below.


Watch above or watch in HD at YouTube

I really love the way the design turned out, and honestly whether you use regular Distress Ink or Distress Oxides, you're going to get a great result.

The regular Distress Inks were a bit brighter but the Distress Oxides were easier to blend. The one drawback to the Distress Oxides is because of how opaque they are, they do dull the back outline. It's not a huge issue but when you love bold black as much as I do it's definitely noticeable.

Thank you guys so much for joining me today! What is your preference Distress Inks or Distress Oxides?

Featured Supplies

For your convenience, here is a list of the featured supplies used on today's project(s), along with links to purchase. Please note: this list contains affiliate links.

Wplus9 White Cardstock
Shop at:
Wplus9
Wplus9 Black Dye Ink
Shop at:
Wplus9
Wplus9 Beautiful Bouquet: Ranunculus
Shop at:
Wplus9
Wplus9 Southern Sentiments
Shop at:
SSS | Wplus9
Wplus9 Shimmer Spray Mist
Shop at:
SSS
Sakura WHITE GELLY ROLL Medium Point Pens Set
Shop at:
SSS
EK Success WRITING PEN FINE TIP
Shop at:
SSS
Fiskars PREMIUM CUT LINE Paper Trimmer 12 Inches
Shop at:
SSS
Tombow MONO MULTI Liquid Glue
Shop at:
SSS
Ranger MINI ROUND INK BLENDING TOOLS
Shop at:
SSS
Ranger MINI ROUND FOAM REFILLS for Mini Round Ink Blending Tools
Shop at:
SSS
Tim Holtz Distress Ink Pad SALTY OCEAN
Shop at:
SSS
Tim Holtz Distress Ink Pad PEACOCK FEATHERS
Shop at:
SSS
Tim Holtz Distress OXIDE INK PAD SET OF 12
Shop at:
SSS
Tim Holtz Distress Oxide Ink Pad WILTED VIOLET
Shop at:
SSS
Ranger Inkssentials Non Stick CRAFT SHEET
Shop at:
SSS
Tim Holtz Distress Oxide Ink Pad FOSSILIZED AMBER
Shop at:
SSS
Tim Holtz Distress Oxide Ink Pad SPICED MARMALADE
Shop at:
SSS
Tim Holtz Distress Ink Pad PICKED RASPBERRY
Shop at:
SSS
Tim Holtz Distress Ink Pad FOSSILIZED AMBER
Shop at:
SSS
MINI MISTI PRECISION STAMPER Stamping Tool Kit
Shop at:
SSS
3M 2 INCH WIDE POST-IT TAPE
Shop at:
SSS
Tim Holtz Distress Ink Pad SALTY OCEAN
Shop at:
SSS
Judikins Eclipse ART MASKING TAPE
Shop at:
SSS
Tim Holtz Distress Ink Pad WILTED VIOLET
Shop at:
SSS
Tim Holtz Distress OXIDE INK PAD SET OF 12
Shop at:
SSS
Tim Holtz Distress Oxide Ink Pad PEACOCK FEATHERS
Shop at:
SSS
Tim Holtz Distress Oxide Ink Pad PICKED RASPBERRY
Shop at:
SSS
Tim Holtz Distress Oxide Ink Pad SALTY OCEAN
Shop at:
SSS
We R Memory Keepers TRIM AND SCORE Board
Shop at:
SSS
Tonic CRYSTAL GLAZE Nuvo
Shop at:
SSS
Tim Holtz Distress Ink Pad SPICED MARMALADE
Shop at:
SSS

Connect with us:

Follow Us on Pinterest